Add Row
Add Element
Southeast Michigan Home and Yard Logo
update
update
Add Element
  • Home
  • Categories
    • Home
    • Yard
    • Technology
    • News
    • Food
    • Events
    • Featured

Southeast Michigan

HOME AND YARD

  • Facebook Home and Yard Page
    update
  • update
  • update
  • update
  • update
  • update
  • update
August 21.2025
3 Minutes Read

Discover How to Make Creamy Baba Ganoush at Home Easily

Homemade baba ganoush in a ceramic bowl garnished with spices.

How to Make Delicious Baba Ganoush at Home

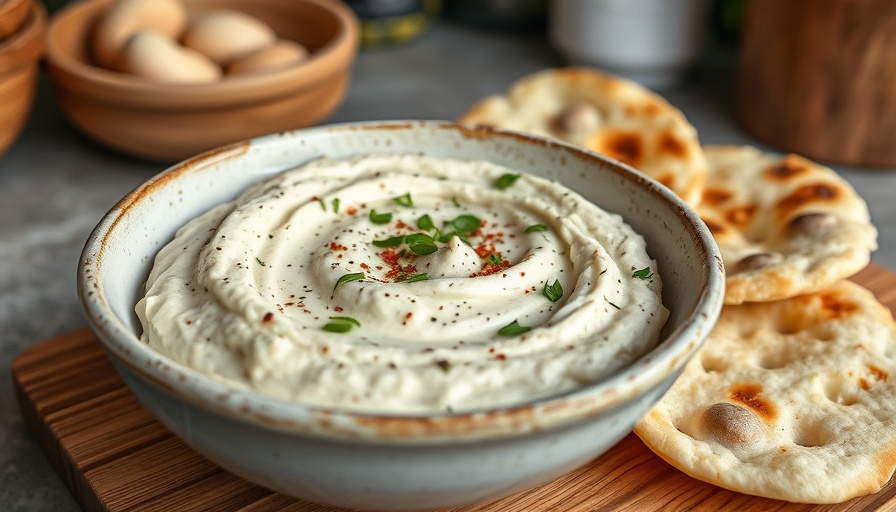
If you're searching for a refreshing dip to elevate your snack game or impress guests at your next gathering, look no further than baba ganoush. This creamy dish, rich with smoky flavors from roasted eggplant, is a staple in Mediterranean and Middle Eastern cuisine. Whether served with pita or fresh veggies, this versatile dip is not only simple to make but also healthy, making it perfect for families looking to add a flavorful touch to their meals.

The Basics of Baba Ganoush

Baba ganoush might sound exotic, but it's surprisingly easy to whip up. Traditionally, it features roasted eggplant, tahini, lemon juice, and garlic, blended to perfection for a creamy consistency. While hummus has chickpeas as its star ingredient, baba ganoush focuses on the unique taste of eggplant, adding an earthy undertone that’s irresistible.

Ingredients You’ll Love

Gathering the right ingredients is key to mastering baba ganoush. Here’s what you need:

  • Eggplant: Choose firm, unblemished varieties for the best flavor. Feel free to experiment with different types like Japanese or Chinese eggplants.
  • Tahini: This sesame paste adds creaminess and depth. You can buy it or easily make your own!
  • Fresh Lemon Juice: For a zesty kick, always opt for fresh over bottled.
  • Garlic: A little goes a long way in enhancing the flavor.
  • Seasonings: Don't shy away from seasonings like red pepper flakes or smoked paprika for an extra layer of taste.

Step-by-Step Guide to an Amazing Baba Ganoush

Follow these easy steps to create your very own baba ganoush:

  1. Roast the Eggplants: Preheat your oven to 400°F (200°C). Prick the eggplants with a fork and place them on a baking sheet. Roast for about 30-40 minutes, or until the skin is charred and the flesh is soft.
  2. Blend Ingredients: Once the eggplants are cool, scoop out the flesh and place it in a food processor. Toss in tahini, lemon juice, garlic, and any additional seasonings you fancy.
  3. Pulse to Preference: Be careful not to over-blend; aim for a smooth but slightly chunky consistency.
  4. Chill and Serve: For the best flavor fusion, chill the baba ganoush for at least 30 minutes before serving.

Serving Suggestions for Every Occasion

Your homemade baba ganoush can be enjoyed in countless ways:

  • As a Dip: Serve it with pita bread, fresh vegetables, or chips as a delicious appetizer.
  • On Sandwiches or Wraps: Spread baba ganoush on turkey wraps for a healthy yet satisfying lunch.
  • With Crostini: Pair it with toasted bread for a delightful twist at gatherings.
  • As a Garnish: Use it in portobello mushroom caps for a modern take on vegetarian meals.

Healthy Benefits of Baba Ganoush

In addition to its exquisite taste, baba ganoush is packed with health benefits:

  • Low in Calories: Eggplant is a great option for those watching their calories while still providing essential nutrients.
  • High in Fiber: The fiber content helps with digestion and keeps you full, making it a smart addition to your healthy meals.
  • Rich in Healthy Fats: Tahini offers healthy fats that can support heart health.

Exploring Variations: Make It Your Own!

Feel free to get creative. If you don’t have tahini on hand, substitutes like Greek yogurt or nut butters can provide a similar creamy texture. Add spices or herbs like cumin or basil to give your baba ganoush a unique twist! And don’t forget garnishes to elevate your dish—think fresh parsley or pomegranate seeds for a burst of color.

Storing and Freezing Baba Ganoush

Wondering how to keep your baba ganoush fresh? Store leftovers in an airtight container for up to three days in the fridge. For longer storage, you can freeze portions in zippered bags, where they’ll last for a month. Just remember to thaw in the refrigerator before serving.

Conclusion: Ready to Dive In?

Baba ganoush is more than just a delicious dip; it’s a celebration of flavors that can transform ordinary meals into extraordinary experiences. With its simple ingredients and easy prep, it’s destined to become a favorite in your household. So, gather those ingredients and bring the taste of the Mediterranean right to your kitchen! Leave a comment below sharing your experiences and variations with this delightful dish!

Food

Write A Comment

*
*
Related Posts All Posts
10.21.2025

Eggplant Parmesan: A Cozy, Cheesy Classic for Family Nights

Update The Comforting Delight of Eggplant ParmesanEggplant Parmesan is not just another dish; it's a culinary hug. This beloved Italian classic brings together the earthy flavors of the eggplant with the rich, savory notes of marinara sauce and the gooey goodness of melted mozzarella cheese. Baking rather than frying the eggplant makes this dish lighter and less messy, perfect for busy families looking to whip up a comforting dinner without the fuss.Understanding the Ingredient EssentialsChoosing the right ingredients contributes immensely to the success of your Eggplant Parmesan. Look for firm, shiny eggplants without blemishes; medium to large pear-shaped varieties work wonders in this dish. Feel free to customize the breading with Italian-seasoned or homemade breadcrumbs for that extra zing. On the cheese front, combining fresh mozzarella and grated Parmesan creates a heavenly layer of flavor.Culinary Techniques That ShineThe technique here is straightforward, but it makes a world of difference. Instead of the traditional frying method, you’ll slice your eggplant, salt it to draw out moisture, then bread and bake it until golden. This not only cuts down on mess but also infuses a delightful crispness. Layering the baked eggplant with marinara sauce and cheese allows for an explosion of flavors when served.Serving Suggestions: A Complete MealWhat pairs well with Eggplant Parmesan? A crisp salad with a tangy vinaigrette is an excellent side. Garlic breadsticks are also a favorite, not just for taste but to soak up that delicious marinara. You can even prepare this dish ahead of time; freeze it unbaked for those nights when cooking feels like too much of a chore. When ready, just thaw it overnight and pop it into the oven.Healthier Choices: Variations on a ClassicFeeling adventurous? You can layer in other vegetables like zucchini and mushrooms for a nutrient boost. It’s also a wonderful way to get kids involved in the kitchen. They can sprinkle the cheese and begin to understand the magic of combining flavors. Plus, you can swap out breading for gluten-free options or have fun experimenting with seasonings to cater to your family's unique tastes.Practical Tips for SuccessWhen preparing your dish, remember to consistently check the cooking times; ovens can vary significantly. Some recommendations suggest pre-baking the eggplant for about 20 minutes before layering, and always let it sit after baking for the flavors to meld. Don’t hesitate to add herbs like fresh basil or oregano between layers for an aromatic finish.Why This Dish MattersEggplant Parmesan isn't just food; it’s a gateway into culinary creativity. For homeowners in southeast Michigan, this dish embodies the spirit of community, as it’s perfect for sharing at gatherings or enjoying on cozy nights at home. With its affordability and adaptability, it fits perfectly into the realm of 'eating on a dime' while not sacrificing nutrition or taste.Action Steps to Elevate Your CookingAre you ready to make Eggplant Parmesan part of your family routine? Try preparing this dish over the weekend, and enjoy the leftovers throughout the week. Gathering with your loved ones and sharing meals made with love can turn into cherished family traditions.

10.20.2025

Unlock the Secrets to Making Delicious Sausage Gravy at Home

Update Why Sausage Gravy is a Timeless Comfort Food In a world where cooking styles and tastes often change, many find solace in classic dishes that remind them of home. Sausage gravy, a staple in Southern breakfasts, is one such dish that brings back memories of family gatherings, hearty breakfasts, and comfortable moments. This creamy delicacy, often served atop biscuits or alongside eggs, combines the rich flavors of sausage with a soothing, velvety sauce that's quick to whip up — ideal for busy mornings. Mastering the Art of Sausage Gravy: Simple Ingredients, Amazing Flavor What makes this sausage gravy recipe so approachable is its simplicity. With just four essential ingredients—ground pork sausage, butter or bacon fat, all-purpose flour, and whole milk—you can create a rich and creamy sauce that bursts with flavor. The sausage provides a familiar peppery taste that, when combined with a bit of butter to create a roux, becomes the foundation of this comforting dish. Instead of overcomplicating the preparation, one of the keys is to **avoid draining the fat** left in the skillet after cooking the sausage. This fat is crucial for the flavor and richness of the gravy. For those looking to spice it up, consider using flavored sausage or adding seasonings like sage or crushed red pepper. With minimal effort, you can elevate the taste of this dish to new heights. Serving Suggestions: Beyond Just Biscuits While sausage gravy is traditionally associated with fluffy buttermilk biscuits, it also pairs beautifully with a variety of breakfast items. Imagine pouring this delectable gravy over some crispy fried chicken, mixing it into scrambled eggs, or even drizzling it on a warm waffle. The versatility of sausage gravy means it's not just a breakfast item; it can enhance any meal—making it a great choice for feeding friends and family. Healthy Twists for Nutritional Wholeness For those who wish to make this dish a bit healthier, there are great alternatives without sacrificing taste. Use lean turkey sausage to cut down on fat or incorporate some finely chopped vegetables like bell peppers or spinach to boost nutritional content. You can also substitute whole milk for lower-fat alternatives or even plant-based milks, adjusting the thickness to your preference. This way, you can indulge in comfort food while keeping health in mind. A Guide to Perfecting Your Sausage Gravy Technique The preparation of sausage gravy doesn’t require any advanced cooking skills, making it perfect for budding chefs or busy parents. Here’s a step-by-step guide to ensure your gravy comes out perfect every time: Brown the Sausage: Start by breaking up one pound of ground sausage in a skillet over medium heat. Cook until no pink remains and it’s golden brown. Add the Roux: Next, stir in a tablespoon of butter (or bacon fat) and let it melt. Sprinkle in a quarter cup of flour, mixing well and cooking for a minute to avoid any raw flour taste. Incorporate the Milk: Gradually pour in around two and a half cups of whole milk, stirring continuously to achieve a smooth consistency. Keep cooking until the gravy thickens to your liking. Season to Taste: Finish with salt, pepper, and any additional seasonings you desire. This recipe is not only straightforward, but it also invites room for personalization, ensuring that your love for food shines through. Why You Should Try Making Sausage Gravy Today This sausage gravy recipe is more than just a meal—it's an experience that ties people together. It’s about the aroma of breakfast wafting through the house and the joyous sounds of everyone gathering around the table. So why not bring this comforting dish into your home? Whether you’re feeding a crowd or enjoying a quiet breakfast for yourself, sausage gravy is sure to warm your heart and satisfy your taste buds. Try out this recipe and watch as it becomes a cherished part of your family's culinary traditions!

10.20.2025

Savor the Flavor: Embrace the Mexican Chicken and Rice Casserole

Update Delicious and Nutritious: Discovering the Mexican Chicken and Rice Casserole Looking for a cozy dish that not only satisfies your taste buds but also embodies warmth and comfort? The Mexican Chicken and Rice Casserole is a delightful option that ticks all the boxes for an easy-to-prepare meal that's packed with flavor. This dish combines the hearty goodness of chicken, the wholesome nature of rice, and the bold spices of Mexican cuisine to create a dinner everyone will love.In Mexican Chicken and Rice Casserole, the focus is on creating a comforting and easy-to-make dish that promotes family gatherings and healthy eating, prompting us to explore its benefits and preparation tips. Benefits of Embracing a Home-Cooked Meal In our fast-paced world, home-cooked meals often take a backseat. However, dedicating time to prepare dishes like the Mexican Chicken and Rice Casserole brings numerous advantages. It not only allows families to reconnect over dinner but also opens the way to healthier eating habits. When you cook at home, you choose fresh ingredients, manage portion sizes, and reduce the likelihood of hidden sugars and fats found in takeout meals. The Versatility of Casseroles Casseroles are incredibly versatile and perfect for families with varying tastes. Whether you want to add extra vegetables, swap chicken for another protein, or adjust the spice level to suit your family’s palate, the Mexican Chicken and Rice Casserole can be tailored for everyone. This encourages creativity in the kitchen and helps children develop a willingness to try new foods. How to Prepare the Perfect Mexican Chicken and Rice Casserole Making the perfect Mexican Chicken and Rice Casserole is not only simple but also provides an opportunity to engage the entire family in the cooking process. Start by gathering your ingredients: chicken breast, long-grain rice, diced tomatoes, black beans, corn, cheese, and a blend of spices such as cumin, chili powder, and garlic. Cooking the rice beforehand allows for better flavors to meld together. Layer the cooked rice with seasoned chicken, followed by the veggies and topped with cheese. Bake until bubbly and golden. This straightforward preparation method fosters teamwork and gives kids the excitement of seeing their contributions come to life! Making It Your Own: Fun Variations One of the most enjoyable aspects of the Mexican Chicken and Rice Casserole is how it can become a foundation for experimenting. Adding ingredients like bell peppers, zucchini, or even different types of cheese can elevate the flavors further. Always remember to adjust the cooking time as needed, depending on the extra ingredients you incorporate. Why Comfort Food Matters In today’s rapidly changing world, comfort food plays a crucial role in our lives. Recipes like the Mexican Chicken and Rice Casserole evoke nostalgia and provide not just nourishment but also emotional support. They offer a sense of belonging and a moment to unwind amidst chaos, reminding us of the importance of dietary choices in nurturing our mental health. Practical Tips for Meal Prep Consider doubling your recipe for the Mexican Chicken and Rice Casserole and freeze half for a quick meal later. Meal prepping showcases not just efficiency but also promotes a lifestyle of healthy eating. Having nutritious meals on hand helps stave off temptation from unhealthy snacks and fast-food options. Get Cooking! If you haven’t tried your hand at making a casserole yet, now is the time. The Mexican Chicken and Rice Casserole not only satisfies the family’s hunger but also serves as a delightful way to bond over the preparation and enjoyment of food. So gather your loved ones, put on some music, and get cooking. You'll be surprised at how much joy and connection a simple dish can inspire!

Terms of Service

Privacy Policy

Core Modal Title

Sorry, no results found

You Might Find These Articles Interesting

T
Please Check Your Email
We Will Be Following Up Shortly
*
*
*