Add Row
Add Element
Southeast Michigan Home and Yard Logo
update
update
Add Element
  • Home
  • Categories
    • Home
    • Yard
    • Technology
    • News
    • Food
    • Events
    • Featured

Southeast Michigan

HOME AND YARD

  • Facebook Home and Yard Page
    update
  • update
  • update
  • update
  • update
  • update
  • update
July 29.2025
3 Minutes Read

Discover the Delight of Dill Pickle Nachos: A Fun Twist on a Classic

Appetizing Dill Pickle Nachos Recipe with vibrant toppings.

Embracing the Crunch: Why Dill Pickle Nachos Are a Must-Try

If you're looking for a fun and flavorful twist on your usual nacho night, look no further than crispy dill pickle nachos! This creative dish combines the bold crunch of kettle chips with gooey cheese and tangy pickles, resulting in a savory treat that’s perfect for family gatherings or game day. Imagine biting into a crunchy chip topped with warm cheese and a flavor explosion that your taste buds will thank you for.

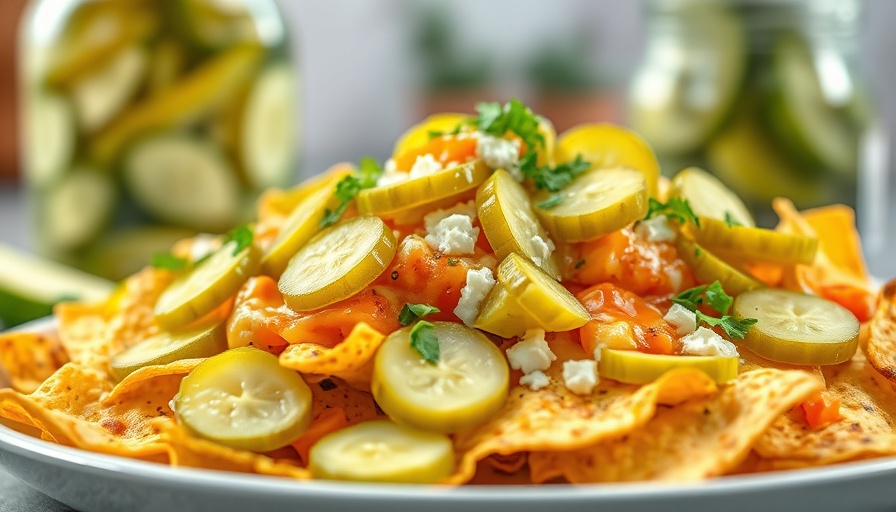
Flavors That Kick: What Makes These Nachos Stand Out?

Dill pickle nachos bring together a wonderful blend of flavors that are sure to impress. The combination of melted mozzarella and provolone cheese envelops crispy kettle chips, creating a delightful base. Top it all off with pickles, jalapeños, and crispy bacon, and you've got a textural and flavor experience that’s truly unique. Additionally, the zesty sour cream dip adds a creamy finish that perfectly balances the bold flavors in this dish.

Preparation Made Simple: How to Create These Nachos

Getting these delicious nachos ready is a breeze! Start by prepping your tangy dipping sauce and letting it chill in the fridge. Then, layer the kettle chips on a lined baking sheet. Mix cheeses with dill and garlic powder for extra flavor and top your chips with pickles, jalapeños, and bacon before baking until bubbly. Trust me, these steps are straightforward even for those who might be new to home cooking.

Why You Should Make these Nachos Today

For busy homeowners in southeast Michigan, finding quick and satisfying meal options can be a challenge. Dill pickle nachos are not only easy to prepare but also provide a great way to enjoy a family meal or snack while staying budget-friendly. They utilize simple components that you may already have in your pantry, cutting down on food costs without compromising on flavor.

Something for Everyone: Customizing Your Dish

One of the most enjoyable parts of making dill pickle nachos is how easily they can be customized. If bacon isn't your thing, feel free to swap it out for deli ham or keep it vegetarian. Grappling with a diverse palate? Consider adding an extra layer of spice by mixing in jalapeño Havarti or pepper jack cheese for those who enjoy a little heat. With such a versatile dish, everyone can relish in this crunchy delight!

Pro Tips for Leftovers: How to Keep the Crunch

If you find that you have any leftover nachos, don’t fret! These can be stored in an airtight container in the fridge for up to two days. To restore that wonderful crunch, simply reheat them in the oven for a few minutes. They’ll taste just as delicious on day two as they did fresh out of the oven.

Join the Fun: Create Family Memories with Dill Pickle Nachos

There's something inherently joyful about gathering together to enjoy a shared meal. With easy-to-follow steps and delicious flavors, dill pickle nachos not only satisfy cravings but also evoke warm memories of family and friends coming together. Whether for a casual weeknight dinner or a sporting event, they’re bound to be a crowd-pleaser.

So, what are you waiting for? Dive right into these delicious dill pickle nachos today. Not only will your taste buds thank you, but you may find that this easy recipe becomes a regular staple at your home! Let's get cooking and enjoy the flavors of togetherness.

Food

Write A Comment

*
*
Related Posts All Posts
07.31.2025

Create Delicious Homemade Cocktail Sauce Using Just 4 Ingredients

Update Unlock the Secret to Perfect Homemade Cocktail Sauce Ever found yourself staring at a bowl of bland shrimp with nothing to dip it in? Fear not! With just four simple ingredients, you can whip up a tangy, spicy homemade cocktail sauce that elevates your seafood dishes. This easy recipe combines ketchup, horseradish, lemon juice, and a pinch of salt and pepper to create a flavor explosion that’s perfect for any seafood gathering. Making Cocktail Sauce at Home: Why It’s Worth It Using homemade sauces can completely change your dining experience. Not only do you control the ingredients, but you also skip the preservatives often found in store-bought varieties. A fresh batch of cocktail sauce is just minutes away, making it a breeze to wow your family and friends. Choosing the Right Ingredients for Your Sauce The beauty of cocktail sauce lies in its simplicity, but choosing quality ingredients can take it to the next level. Start with any ketchup you love; consider a low-sugar option if you’re keeping an eye on carbs. For horseradish, you can go basic or opt for creams or flavored varieties for a unique twist. Mixing it Up: Flavor Variations You’ll Love Want to kick things up a notch? Swap regular ketchup for chili sauce for an extra spicy kick! You can also play with seasonings—add a touch of homemade Old Bay or Cajun flavors, or if you're feeling adventurous, toss in some cooked shrimp or crab into your sauce for a flavorful seafood spread. Storing and Serving Your Cocktail Sauce Got leftovers? No problem! Store your sauce in a tightly sealed jar in the refrigerator for up to a week. The best part? You can transform your leftover sauce into a creamy dip by mixing it with cream cheese and jazzing it up with fresh veggies or crackers. It's a delightful way to use every drop! Perfect Pairings for Your Cocktail Sauce The versatility of cocktail sauce is astonishing. Beyond just shrimp cocktails, it makes an excellent complement to crab cakes, crispy cauliflower, or even zucchini fritters! Just imagine serving a platter of your delicious homemade cocktail sauce at your next family gathering—it's bound to impress. Common Misconceptions About Homemade Sauces Many people think that a flavorful dip requires a long list of ingredients or complicated steps. The truth is, often the simplest recipes are the most rewarding. With just a few staple items from your fridge, you can create something special that’s tailored to your taste! Why Making Sauces is Engaging and Fun Cooking should be all about joy and creativity, and crafting your own sauces allows you to express your culinary flair without spending hours in the kitchen. Whether you’re hosting a barbeque or simply spicing up a family dinner, homemade sauces like this cocktail sauce bring excitement to your meal prep. Actionable Insights: Dive In Now! Feeling inspired? Gather your ingredients and get started on your cocktail sauce! Share your creative twists or variations with family and friends—who knows, maybe they’ll have an exciting new take on it as well! Cooking is much more than mere sustenance; it’s a celebration of flavors, traditions, and joyous moments spent together. Explore the world of homemade sauces and elevate your cooking game today!

07.29.2025

How to Make Easy Weeknight Stuffed Peppers for Healthy Meal Prep

Update Colorful and Cozy: The Appeal of Stuffed Peppers Stuffed peppers are not just a meal; they’re a canvas for creativity in the kitchen. Imagine biting into a tender bell pepper, bursting with flavors of ground meat, savory spices, and melted cheese. For homeowners in Southeast Michigan looking to elevate their weeknight dinners, this classic dish is not only a feast for the eyes but also a heartwarming supper that’s perfect for the entire family. Simple Steps to Savoring Stuffed Peppers Making stuffed peppers is an easy yet satisfying process. First, you’ll want to brown your meat, usually a combination of ground beef and Italian sausage. The aroma filling your kitchen is sure to entice everyone in the household. Next, you’ll mix in your uncooked rice, tomato sauce, and seasonings, allowing the flavors to blend as the rice cooks. As a preparation tip, simmer your bell peppers for a few minutes to soften them. This little step goes a long way in achieving that perfect tender bite when baked. Meal Prep: A Budget-Friendly Solution One of the best parts about stuffed peppers is their suitability for meal prep. You can freeze them before baking, making batch cooking a breeze. Simply prepare the filling, stuff the peppers, and freeze them in a tightly sealed container. On busy weeknights, just thaw them and pop them in the oven—dinner is ready in no time! For those monitoring their budgets, consider substituting some of the meat with beans or extra vegetables. This not only stretches your ingredients but also boosts the nutritional profile of your meal. Cooking with Love: Connecting through Food Food has a unique way of connecting us, especially when it comes to preparing dishes that conjure up family memories. Growing up, my grandmother always believed that cooking is a form of love. This belief fuels my passion for food. Making stuffed peppers can be a bonding activity—invite your kids to help fill the peppers, teaching them about different ingredients and spices. When they help create the meal, they’re more likely to enjoy it! Creative Variations for Every Palate While the classic stuffed pepper recipe is a crowd-pleaser, don’t hesitate to play around with flavors. Try adding black beans for a Tex-Mex twist or Italian seasoning for an Italian flare. You can even try incorporating grains like quinoa for a nutrient boost or cooking the rice in vegetable broth to enhance flavor. The possibilities are endless! Healthy Eating: Making Comfort Food Guilt-Free Caring for our health doesn’t have to mean sacrificing flavor. With stuffed peppers, you can make hearty and healthy meals. Opt for lean ground turkey or chicken, and load up on veggies like chopped spinach or mushrooms in the filling. Not only do these additions cut calories, but they elevate the taste and texture of your dish. Plus, using whole grain rice instead of white rice can add fiber and additional nutrients, creating a meal that is both comforting and wholesome. Practical Storing Tips: Keeping It Fresh Leftover stuffed peppers can last up to four days in the fridge when stored in an airtight container. They are perfect for re-heating at lunchtime or as a quick dinner option. For longer storage, freeze them before baking. Just remember to thaw overnight in the fridge and add 15 minutes to the baking time. Following these simple storage tips can ensure you enjoy your delicious peppers without waste. Quick-Tips Summary for Successful Stuffed Peppers Use any color of bell peppers—green for a more earthy flavor or red for sweetness. Mix different proteins—don’t be afraid to experiment with ground turkey or vegetarian meats. Incorporate additional vegetables for added texture and flavor. Store stuffed peppers appropriately to maximize freshness. Cooking can feel overwhelming, especially for busy professionals and parents. But with easy, delicious recipes like stuffed peppers, you can create meals that are quick, budget-friendly, and most importantly, packed with love. Get into the kitchen and prepare this classic dish that brings family and friends together around the dinner table! Now that you're equipped with all these tips and tricks on making stuffed peppers, grab your ingredients, round up your loved ones, and embark on your cooking adventure. With every bite, you’ll not only satisfy hunger but also nourish connections and create lasting memories in your home.

07.31.2025

Unlock the Secret to Soft & Gooey Hawaiian Sweet Roll Cinnamon Buns

Update Delicious and Effortless: The Joy of Cinnamon Buns If you love cinnamon rolls but dread the thought of the complex process involved in making them, you’re in for a treat! The video, Soft & Gooey Hawaiian Sweet Roll Cinnamon Buns, introduced a game-changing recipe that simplifies the traditional approach, allowing you to savor those delectable flavors with minimal effort. Using King's Hawaiian rolls as a base, you can whip up a batch of gooey cinnamon buns that are perfect for breakfast or a sweet snack.In Soft & Gooey Hawaiian Sweet Roll Cinnamon Buns, the discussion dives into a hassle-free recipe for delicious treats, inspiring us to explore the joys of simple cooking. Step-by-Step Guide to Cinnamon Heaven The beauty of this recipe lies in its simplicity. With just a few ingredients and minimal prep time, you can create a batch of cinnamon rolls that seem like they came from a bakery. The process starts by mixing butter, brown sugar, and cinnamon until it’s smooth. After preheating your oven, preparing the Hawaiian rolls is as easy as cutting them in half and spreading the buttery mixture generously on both halves. Baking for just 15 minutes fills your kitchen with that irresistible aroma of cinnamon, making the anticipation even sweeter. Frosting: The Icing on the Cake! What elevates these cinnamon buns from delicious to divine is the cream cheese frosting. Combining softened cream cheese with powdered sugar, milk, and vanilla creates a rich, smooth topping that melts into the warm rolls, making every bite melt-in-your-mouth good. This frosting is not only easy to make, but it also adds that perfect hint of tanginess that balances the sweetness of the rolls. Why This Recipe Resonates with So Many In today’s fast-paced world where time spent in the kitchen can often feel overwhelming, the appeal of quick and easy recipes is undeniable. The soft and gooey Hawaiian sweet roll cinnamon buns cater to busy families and individuals who still want to enjoy homemade sweetness without the hours of preparation usually involved. It's a delightful way to treat yourself and your loved ones without the fuss. A Sweet Connection to Happy Memories There’s something inherently nostalgic about cinnamon rolls that can evoke warm memories of family gatherings or holiday mornings. By simplifying the process with Hawaiian rolls, this recipe not only saves time but also makes it easier to create those cherished moments again. Whether enjoyed during a cozy brunch or as an afternoon snack, these buns can be a means to foster connection, family, and tradition. Get Ready to Bake! Now’s the time to gather your loved ones and try out this delightful recipe. Baking together can be a wonderful way to bond, and nothing beats the taste of warm cinnamon rolls fresh from the oven. So preheat that oven to 350°, and get ready to enjoy the gooey goodness of Hawaiian sweet roll cinnamon buns. For a full list of ingredients and directions, check out Eating On Aime for the complete recipe. Enjoy!

Terms of Service

Privacy Policy

Core Modal Title

Sorry, no results found

You Might Find These Articles Interesting

T
Please Check Your Email
We Will Be Following Up Shortly
*
*
*