Add Row
Add Element
Southeast Michigan Home and Yard Logo
update
update
Add Element
  • Home
  • Categories
    • Home
    • Yard
    • Technology
    • News
    • Food
    • Events
    • Featured

Southeast Michigan

HOME AND YARD

  • Facebook Home and Yard Page
    update
  • update
  • update
  • update
  • update
  • update
  • update
June 29.2025
3 Minutes Read

Discover the Easiest Way to Harvest Horseradish Like a Pro

Freshly harvested horseradish roots with earthy textures.

Unlock the Secrets of Horseradish Harvesting for Homeowners

Horseradish is a spicy root vegetable that packs a punch, whether used as a condiment or for its remarkable health benefits. If you’re a homeowner in Southeast Michigan looking to grow your own horseradish, mastering the harvest is key to making the most of this flavorful root. Here’s your foolproof method for harvesting horseradish the right way!

When to Harvest Horseradish for Maximum Flavor

Timing is crucial when it comes to harvesting horseradish. According to experts, the best time for harvesting is after the first hard frost, ideally in late fall. This is when the plant has stored the most sugars and gained flavor, ensuring that you get the best taste when you finally dig it up. Dr. Elizabeth Ann Wahle from the University of Illinois Urbana-Champaign emphasizes not to rush this process:

“If you harvest prematurely, you risk getting undersized roots that lack full flavor and heat.”

Most horseradish plants will be ready for a successful harvest about a year after planting, so patience will be your ally in this endeavor.

Harvesting Techniques: Manual vs. Mechanical

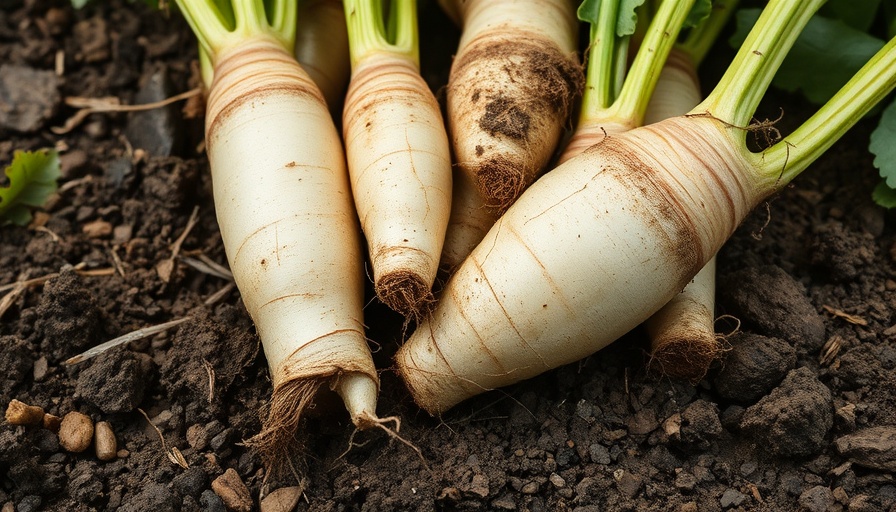
Unlike many vegetables that spread from seeds, horseradish grows from its root, making harvesting unique. Home gardeners like you can use manual methods, which are often more effective than mechanical methods used in larger agriculture. A garden fork is your best friend here. Start loosening the soil about a foot away from the plant's base to avoid breaking the roots. Careful digging prevents splitting the root, which can affect quality.

After lifting the plant, you’ll want to trim any offshoot roots but keep roots that are at least eight inches long for storage. Dr. Wahle has a handy tip for cutting the roots:

“Cut squarely across at the top and slope towards the bottom. This will make it easier to know which end to set upright at planting time.”

Effective Storage Methods for Fresh Horseradish

Once harvested, preserving horseradish is crucial if you want to enjoy its flavor long after you’ve pulled it from the ground. If you plan on consuming it shortly after harvesting, give the roots a thorough wash, then store them in a sealed plastic bag in the refrigerator. For those who want to store horseradish for a longer time, try keeping the roots in sand in a root cellar or a plastic bag with moist sand in the fridge. This approach will keep your horseradish fresh and ready for those future meals!

Dos and Don'ts to Keep in Mind

As with any gardening project, it’s vital to know the best practices to ensure an abundant harvest. Here are some expert-approved dos and don'ts:

  • Do wait for the right time to harvest for maximum flavor.
  • Don't ignore the quality of the soil; make sure it's loose enough for effective harvesting.
  • Do save some roots for the next season.
  • Don't harvest when the ground is excessively wet, as it may damage the roots.

Why Horseradish Matters for Homeowners

For every homeowner, growing and harvesting your own horseradish can be a fulfilling DIY project. Not only does it enhance your culinary creations, but it also provides an excellent way to enjoy the outdoors while improving your garden's diversity. Understanding the proper harvesting methods translates into better flavors on your plate and a sense of accomplishment in your gardening journey.

So roll up those sleeves and get ready to give horseradish a try in your own garden. It’s time to enjoy the bounty of your labor! For your next culinary adventure, follow these harvesting tips to ensure you unleash the full potential of horseradish.

Home

Write A Comment

*
*
Related Posts All Posts
08.16.2025

Ready for a Full Gut Kitchen Remodel? Here’s What to Expect

Update Understanding a Full Gut Kitchen Remodel If you're a homeowner contemplating a major change in your kitchen, you’re in good company. Many people are beginning to realize that a simple facelift—like painting cabinets or adding a new backsplash—often doesn't solve underlying problems. Instead, a full gut kitchen remodel can completely reshape your space, offering not just aesthetic improvements but also functionality and safety. So, what exactly does a full gut entail? What Is a Full Gut Kitchen Remodel? A full gut kitchen remodel is essentially a clean slate. This process involves stripping down everything—old cabinets, countertops, appliances, and sometimes even walls—to their bare bones, providing a blank canvas for your new design. Homeowners might choose this route for several reasons: when the current layout feels cramped, when plumbing or electrical systems are outdated, or when they want to make major structural adjustments. There are substantial benefits to undertaking a full overhaul. Not only does it enhance the flow of your kitchen, but it can also significantly improve safety, elevate your home’s market value, and customize the kitchen to meet your specific needs. The Importance of Planning and Design Before diving into demolition, planning for your kitchen remodel is crucial. Think of this stage as laying the foundation for your project’s success. Here’s what it involves: Hiring a Reliable Contractor: Invest time in selecting a reputable contractor who specializes in kitchen remodeling. A skilled contractor can help steer the process, ensuring efficiency and quality. Consulting Experts: Speak to interior designers and kitchen specialists who can help you define the vision for your new space. This collaboration will shape the look and functionality of your kitchen. Mapping Out a Comprehensive Design: Create detailed plans that include layout changes, appliance placement, storage solutions, and material selections. Don’t shy away from bold ideas—after all, this is your dream kitchen! Additionally, never underestimate the importance of budgeting. It’s wise to set aside an extra 10-20% of your total remodel budget for unexpected surprises that may arise during demolition. Navigating Permits and Approvals Before any work begins, understanding and acquiring the necessary permits is essential. Depending on your location and the changes being made, you may need to secure permits for tasks such as: Moving walls Updating electrical and plumbing systems Making changes to structural supports By familiarizing yourself with the required permits upfront, you avoid delays that can throw a wrench in your timeline. Tips for a Successful Kitchen Remodel As you embark on your remodeling journey, keep these tips in mind to enhance your experience: Stay Organized: Keep all documents regarding your remodel—contracts, permits, and designs—easily accessible. This organization can help prevent miscommunications with contractors. Communicate Openly: Maintain a dialogue with your contractor, expressing your concerns and preferences. An open line of communication can be the key to a successful project. Envision Your Ideal Space: Engage with design tools or apps that allow you to visualize your new kitchen, making the design process much more tangible. With careful planning and proper execution, your full gut kitchen remodel can be rewarding. As you prepare for the changes ahead, remember that the end result is a space tailored to your needs and lifestyle. Are you ready to embark on this exciting journey toward kitchen renovation? Contact your local home improvement experts to take the first step towards making your dream kitchen a reality.

08.15.2025

School Buses Recalled: Urgent Safety Measures for Parents in Michigan

Update Major Recall of School Buses: What Parents Need to Know As summer winds down and families prepare for the new school year, the National Highway Traffic Safety Administration (NHTSA) has issued a critical alert impacting the safety of school transportation. Nearly 17,000 school buses have been recalled due to significant fire risks primarily linked to their brake systems. For many Michigan homeowners, this news raises essential concerns about our children's safety on the road. Understanding the Risk: Brake System Failures The main issue identified involves electrical failures in the brake pressure switch assemblies of these buses. When brake fluid leaks into the electrical components, it can create dangerous short-circuits. This malfunction could lead to overheating and, potentially, fires whether the bus is in motion or parked. For parents, knowing whether their local school district operates any of these affected buses is crucial. How to Identify Affected Buses The recall specifically affects the 2016 to 2023 IC Bus CESB models manufactured by International Motors, LLC. If your district uses these buses, it is advisable to make alternative transportation arrangements until further notice from your school. Signs introducing greater scrutiny on safety measures are vital in safeguarding our children. Your Action Plan: Keeping Kids Safe The NHTSA emphasizes that until these buses are repaired, owners should park them outside and away from structures to mitigate the fire hazard. International Motors has promised to send out notifications by late September 2025 and will provide free repairs. For questions, parents can reach out to International's customer service hotline at 1-800-448-7825, referencing recall 25510. Future Considerations: How This Affects Families Parents must stay tuned for updates regarding the status of these buses. A proactive stance not only benefits your child’s immediate safety but also reinforces the importance of addressing transportation safety involving our schools. Share this information within your community to ensure all children are secure while commuting. Community Engagement: What Can You Do? As frontline defenders of child safety, Michigan homeowners must be vigilant and involved. If you are aware that your child's school utilizes any of the recalled buses, arrange alternative travel until the all-clear signal is given. Consider discussing the issue with other parents and engaging with the school district for clarity and assurance on safety practices. Conclusion As we prepare for another school year, let’s take these recalls seriously. By staying informed and active in our communities, we can help ensure that our children travel safely to and from school. Remember to check in with your local district about the safety of their transport systems and share this vital information widely.

08.14.2025

Simple Steps for DIY Driveway Crack Repair You Can Afford

Update Mastering Driveway Repair: An Easy and Affordable Solution Cracks in your concrete driveway can bring down the curb appeal and value of your home. Whether you’re dealing with minor fissures or larger cracks, repairing them is simpler and cheaper than you might think. Today, I'll guide you through the steps to fix those annoying cracks and keep your driveway looking neat without breaking the bank. For just $10 to $60, you can restore your driveway in just half a day. Why Concrete Cracks and How to Identify Them Concrete cracks can occur for various reasons—expansion in the winter due to freeze-thaw cycles, rapid drying, or even heavy loads over time can cause stress on your driveway. Knowing how to identify the type of cracks can help you choose the right repair method. Narrow cracks often require a self-leveling filler, while wider cracks might necessitate a non-sag filler to ensure proper application. Essential Tools and Materials for DIY Success Don't worry; you don’t need to be a professional handyman to tackle this project! Here’s what you’ll need: Caulk gun Chip brush Leaf blower or broom Pocket knife Screwdriver Shop vac Spray bottle Concrete crack filler (self-leveling or non-sag) Backer rod Disposable gloves Sand Small dowel Step-by-Step Guide to Fixing Your Driveway Cracks Ready to get started? Here’s a simple, five-step guide to ensure a successful repair: Choose the right concrete sealant: If you're filling narrow cracks, opt for self-leveling filler due to its gooey consistency. For wider cracks, consider using a non-sag filler with a backer rod for added support. Prep the cracks: First, clear out loose debris using your leaf blower or broom. Ensure the crack is dry and clean before proceeding; any moisture can lead to poor adhesion. Fill the cracks: When applying the filler, cut the nozzle at a steep angle for precision. Make sure to fill right up to the edge and push any non-sag filler deep into the crevices. Level up: For deeper cracks, after inserting a foam backer rod, fill in with the concrete filler and smoothen it out to avoid having it sink later. Clean and cure: Allow the filler time to cure as per the instructions on the product label. Avoid any foot or vehicle traffic for at least 24 hours after application. Promotion of DIY Culture: A Valuable Skill Taking the initiative to fix your driveway not only saves you money but also empowers you as a homeowner. Embracing DIY projects can lead to a greater understanding of your home’s systems and help you save on maintenance costs in the long run. As homeowners like those in Southeast Michigan take on small tasks like this, they begin to create a culture of self-sufficiency while enhancing their property value. Don’t Hesitate: Repair Your Driveway Today! No longer should those pesky cracks dominate your driveway. With just a small investment of time and money, you can elevate both the functionality and aesthetic of your home. Take pride in your space and join many homeowners in enjoying the benefits of DIY! If you want to expand your home improvement skills, consider subscribing to our newsletter for more tips, tricks, and comprehensive guides. Join a community of passionate DIYers and learn how to tackle projects with confidence!

Terms of Service

Privacy Policy

Core Modal Title

Sorry, no results found

You Might Find These Articles Interesting

T
Please Check Your Email
We Will Be Following Up Shortly
*
*
*