Add Row
Add Element
Southeast Michigan Home and Yard Logo
update
update
Add Element
  • Home
  • Categories
    • Home
    • Yard
    • Technology
    • News
    • Food
    • Events
    • Featured

Southeast Michigan

HOME AND YARD

  • Facebook Home and Yard Page
    update
  • update
  • update
  • update
  • update
  • update
  • update
April 29.2025
3 Minutes Read

Discover the Joy of Air Fryer Home Fries: A Healthy Twist on a Classic

Crispy air fryer home fries with peppers and onions in a bowl.

Why Air Fryer Home Fries Are a Beloved Choice

Air fryer home fries are not just a side dish; they're a delightful experience that brings the comfort of home into every meal. As someone who grew up surrounded by the aromas of family cooking, I can tell you that these crispy, golden bites are perfect for any time of the day. Whether paired with breakfast eggs, enjoying lunch alongside a sandwich, or as dinner's star next to grilled chicken, they redefine what it means to eat well.

Quick and Healthy: The Magic of the Air Fryer

One of the best things about air fryer home fries is their health benefits. This cooking method uses significantly less oil than traditional frying, allowing you to enjoy that crispy texture without the guilt. For those who are health-conscious or watching their oil intake, this is a game changer. With just a tablespoon of olive oil, you can achieve deliciously crispy potatoes, peppers, and onions that are bursting with flavor.

Ingredient Tips for Top-Notch Home Fries

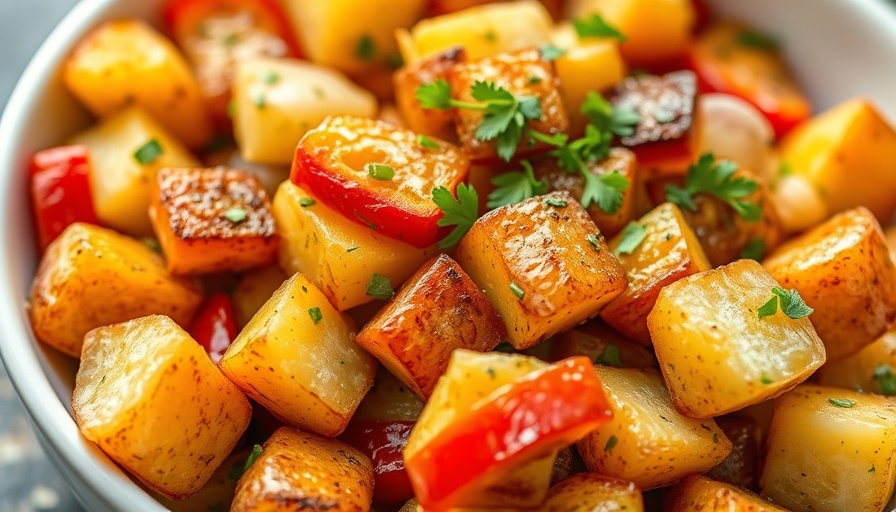
When crafting your own air fryer home fries, the choice of potatoes is crucial. I recommend russet potatoes for their starchy nature that yields fluffy interiors. Yukon gold and red potatoes also work well. Add vibrant bell peppers and onions for layered flavor—these ingredients not only elevate the dish but also bring in that colorful appeal that makes your plate inviting.

Variations That Inspire Creativity

The beauty of air fryer home fries lies in their versatility. Some days, you might fancy a more indulgent version with crispy bacon bits and mushrooms. Other days, you could simply opt for sweet potatoes as a healthy alternative. The addition of herbs and spices can also transform your home fries, turning a basic recipe into something extraordinary. Have fun mixing and matching! This adaptability makes them perfect for meal prep and family gatherings.

Serving Suggestions: More Than Just a Side

These air fryer home fries are excellent alongside various dishes. Imagine them with a fluffy omelet for brunch, or substituted for classic French fries next to your favorite burger or club sandwich. They also pair remarkably well with dipping sauces like ketchup, salsa, or a spicy buffalo sauce, allowing for a truly customized dining experience. It's these little touches that not only enhance the dish but also bring a smile to everyone at the table.

The Emotional Connection to Food

Food has a unique way of connecting us to memories and emotions. In my family, meals were opportunities for storytelling, laughter, and love. When cooking, especially with recipes like air fryer home fries, I encourage others to keep an open mind. Think of these potatoes not just as ingredients, but as vessels of your culinary heritage and as connectors to moments spent with family or friends. Each plate carries the essence of togetherness.

Final Thoughts: Celebrate Home Cooking

In a world where convenience often takes precedence, air fryer home fries remind us of the importance of home cooking. They are simple yet flavorful, and best of all, they help bring families together. So why not give this recipe a try? Gather loved ones and enjoy creating your own delicious variations. Remember, it's not just about the food; it's about embracing the joy of cooking at home.

Ready to dive into some culinary fun? Make your air fryer home fries this week and discover the joy of home cooking!

Food

Write A Comment

*
*
Related Posts All Posts
07.20.2025

Unlock Flavor with Easy Make-Ahead Cheesy Beef Burritos

Update Introducing the Perfect Meal Prep: Cheesy Beef Burritos Finding quick and delicious meals can be a challenge, especially for busy families. If you're one of those homeowners in southeast Michigan looking for a delightful, make-ahead dinner option, look no further than cheesy beef burritos! This recipe combines tender ground beef, refried beans, zesty seasonings, and gooey cheese all wrapped in soft tortillas. If you haven't yet found a go-to burrito recipe, you’re in for a treat! Why Make Cheesy Beef Burritos? Beef burritos are versatile, hearty, and perfect for meal prep. They serve as a great after-school snack for kids or an easy dinner option during busy weekdays. Plus, the taste is irresistible! The best part? These burritos can be customized to your liking, which means you can use leftover ingredients or swap out items based on your preferences. Who wouldn’t love to eat something that tastes amazing and is also budget-friendly? Gather Your Ingredients Here’s what you’ll need to whip up your cheesy beef burritos: 1 pound ground beef (or chicken/turkey) 2 cups refried beans 1 cup shredded cheese (like Monterey Jack or a Mexican blend) 1 medium onion, chopped Soft flour tortillas Your favorite taco seasoning (homemade or store-bought) Take a moment to get your ingredients ready. Once everything is prepped, you’ll be surprised at how quickly these burritos come together! Assembling Your Burritos Like a Pro Now comes the fun part! Before you start, here are Ché’s best tips: Let it Cool: Allow the beef mixture to cool slightly to avoid soggy tortillas. Warm Your Tortillas: Softening your tortillas makes them easier to roll without cracking. Don’t Overfill: Stick to about ¾ cup of filling to make rolling a breeze. On each tortilla, place a generous scoop of the ground beef mixture on top of the refried beans, sprinkle cheese, and fold it up. Voila! Your burrito is ready to be cooked! Cooking Options for Flavor and Crispiness For the ultimate texture and taste, brown your burritos in a skillet with a touch of oil until golden and crispy. This extra step is essential when creating that satisfying crunch! Storage Tips for Later If you're preparing a batch of cheesy beef burritos, make sure to wrap any leftovers tightly in plastic wrap and store them in the fridge for up to four days. Want to enjoy them later? Freezing is a breeze! Just wrap them in foil and place them in zippered bags. They can last up to four months in the freezer—simply thaw in the refrigerator when you're ready to enjoy them again. Creative Variations to Satisfy Everyone Not everyone in the family enjoys beef? Fret not! You can easily switch things up with chicken, turkey, or even a veggie version using black beans. The flavors can also be transformed by adding vegetables like diced tomatoes, bell peppers, or even corn for that extra crunch. Want to keep it light? Consider using whole wheat tortillas or skipping the cheese for a healthier version. There’s truly no wrong way to create your burrito! Bringing the Family Together with Burritos Serving burritos can be a delightful family affair. Set up a burrito bar! Lay out all the ingredients and let everyone customize their own. This not only makes it fun but helps engage kids in mealtime, which can encourage healthier eating habits. Conclusion: A Meal Worth Sharing Cheesy beef burritos are not just a meal; they’re an opportunity to gather around the table with loved ones and create cherished memories. With their comforting flavors and endless customization options, these burritos are bound to become a staple in your menu rotation. Give them a try, and enjoy the deliciousness! Whether it’s for a busy weeknight or a weekend treat, cheesy beef burritos will bring warmth and satisfaction to your dining table. So grab those ingredients, get cooking, and let the flavors of love fill your kitchen. Remember, cooking can be fun and fulfilling! If you loved this recipe, or if you remember fondly the burritos your family made while you were growing up, I’d love to hear your take! Drop a comment below and share your thoughts.

07.21.2025

Discover the No-Bake Peanut Butter Icebox Cake: A Summer Delight

Update Unlocking the Deliciousness of Peanut Butter Icebox Cake If you're looking for a refreshing dessert to beat the summer heat, nothing sounds better than the creamy indulgence of peanut butter icebox cake. This dessert is a breeze to make, requires no baking, and packs a punch of delightful flavors that even the kids will love. In this article, we'll break down the key steps of creating your own version of this popular treat and share a few tips to personalize it to your taste!In 'Easy Peanut Butter Icebox Cake – Cool Summer Dessert,' the video presents a delightful no-bake recipe that inspires us to explore it further. Here’s our take on this summer treat and why it’s a must-try. Simple Ingredients, Big Flavor One of the beauties of peanut butter icebox cake is its straightforward ingredient list. To start, you'll need: Soft cream cheese – for that rich and smooth texture Creamy peanut butter – choose a natural variety for a healthier option Powdered sugar – gives just the right sweetness Vanilla extract – to enhance the flavor Thawed whipped topping – for a fluffy consistency Chocolate graham crackers – the base of your cake Chocolate magic shell – for an irresistible topping HD Minis Reese's Cup – to add a crunchy finish These ingredients not only work together to create a luxurious dessert but also combine flavors that most people adore: chocolate and peanut butter! Chill Out: The Key to Perfect Texture Creating the perfect peanut butter icebox cake is all about patience. The magic happens when you let it chill. By allowing it to sit in the refrigerator for at least four hours (or overnight for the best results), the graham crackers soften, transforming them into deliciously cakey layers. This process is what sets icebox cakes apart from traditional baked cakes. When you're ready to serve, let it sit out for just a bit before slicing into bars. This ensures a slice that holds its shape while still being creamy and delectable. Get Creative: A Twist on Tradition While the classic peanut butter icebox cake is undeniably delicious, don't shy away from putting your twist on it! Here are some ideas to consider: Try using almond butter instead of peanut butter for a unique flavor. Incorporate some crushed bananas or strawberries between the layers for a fruity surprise. Swap the chocolate graham crackers for vanilla or even ginger cookies for a spicier kick. Add a sprinkle of sea salt on top after drizzling the chocolate shell for a sweet and salty combo. Experiment with different toppings like crushed oreos or chopped nuts for added texture. Experimenting with flavors and textures can lead to delightful surprises! Peanut Butter Icebox Cake: More Than Just a Dessert Not only is this cake a fantastic treat for summer gatherings, but it also serves as a conversation starter. Imagine hosting a barbecue and introducing your guests to this vibrant creation. It's an eye-catching dessert that looks as good as it tastes! Best of all, it's incredibly easy to make, allowing you to focus more on spending time with family and friends than on complicated baking steps. Why This Dessert Is Worth a Try Peanut butter icebox cake isn't just a dessert; it's an experience. It's about gathering around the table, sharing stories, and enjoying the little moments of life. Plus, the ingredients are relatively easy to find, and the prep time is minimal—making it a win for parents and busy individuals alike. Whether you're hosting a summer barbecue or simply craving something sweet, this cake fits the bill. Are you ready to dive into creamy, crunchy peanut butter chocolate bliss? Gather your ingredients, whip up this delightful dessert, and enjoy every bite with family and friends.

07.18.2025

Oven-Baked Steak: The Best Way to Cook Delicious Meats at Home

Update Discover the Magic of Oven-Baked Steak If you’re looking to impress your family or friends with a succulent steak dinner, look no further! Cooking steak in the oven is an easy and effective way to achieve tender, juicy meat without the need for a grill. Embrace the warmth of home cooking by following these straightforward steps that promise delicious results. Preparation for Success To start, it’s important to select the right cut of steak. For our recipe, ribeye steaks are ideal due to their marbling, which translates to extra juiciness. Aim for about a 1-inch thickness to strike that perfect balance between a golden crust and a tender center. To prep, let the steak come to room temperature and pat it dry; this helps achieve a better sear. Before cooking, you’ll season the steak generously with olive oil and a blend of your favorite steak seasonings. As you massage the spices into the meat, you’ll intensify the flavor, making sure every bite is simply unforgettable. The Cooking Process: Step-by-Step Here’s a simple way to bake your steak: Start by preheating your oven to a high temperature and ensuring your skillet is oven-safe. Next, heat your skillet until it’s sizzling hot, then add the seasoned steaks. Sear each side until beautifully browned. Finally, transfer the skillet into the oven and finish baking until your desired doneness is reached. Don’t forget to check with a meat thermometer for the perfect cook! The degrees of doneness can vary: rare is about 125°F, medium rare is 135°F, and medium is 145°F. Keep in mind, the steak will continue cooking while it rests, so aim to take it out a few degrees lower than your target temperature. Creating Delicious Pairings While your steak rests, you can whip up an optional pan sauce that elevates your meal even further. Use the drippings from the skillet along with butter, garlic, and a splash of red wine for richness. Add a touch of cream, and you've created a velvety sauce that complements the beef beautifully. Wondering what to serve alongside your steak? Consider easy yet elegant options like cheesy scalloped potatoes or crispy garlic roasted broccoli. These flavors will enhance your meal while keeping it simple and satisfying. Using Leftover Steak Creatively Don’t let any steak go to waste! Leftovers can be transformed into an exciting breakfast with fried eggs, served as tasty steak tacos, or enjoyed in hearty philly cheesesteak wraps. Being resourceful not only saves you money but also adds freshness to your cooking routine. Why Home Cooking Matters Cooking at home is more than just a task; it’s a way to connect with your loved ones, creating memories around the dining table. For homeowners in Southeast Michigan, sharing meals can be a warm family tradition, especially when meals remind us of our roots and heritage. In today’s fast-paced life, taking time to prepare and enjoy a home-cooked meal is a treasure that nourishes not only our bodies but our souls. We all know the struggles of staying budget-friendly during meal prep, and by preparing delicious homemade dishes like this oven-baked steak, you’re investing in both your health and well-being. When cooking is approached with love and intention, it becomes a joyful part of our lives. A Call to Action Are you ready to elevate your home cooking game with this oven-baked steak recipe? Gather your loved ones and turn your kitchen into a place of warmth and gathering. Share your cooking successes, learn how to adapt recipes based on what you have at home, and remember: cooking is a journey that brings us all together!

Terms of Service

Privacy Policy

Core Modal Title

Sorry, no results found

You Might Find These Articles Interesting

T
Please Check Your Email
We Will Be Following Up Shortly
*
*
*