Add Row
Add Element
Southeast Michigan Home and Yard Logo
update
update
Add Element
  • Home
  • Categories
    • Home
    • Yard
    • Technology
    • News
    • Food
    • Events
    • Featured

Southeast Michigan

HOME AND YARD

  • Facebook Home and Yard Page
    update
  • update
  • update
  • update
  • update
  • update
  • update
July 03.2025
3 Minutes Read

How to Make a Delicious Peach Crisp Without the Fuss

Peach crisp recipe with ice cream served in a bowl

Why Peach Crisp is the Perfect Summer Dessert

When summer rolls around, so do visions of warm, juicy peaches and delightful desserts. Peach crisp, with its sweet succulent fruit and crispy topping, perfectly encapsulates the flavors of the season. Imagine serving this at your next barbecue or family gathering in southeast Michigan—it's not only a dish that pleases the palate but also evokes fond memories of family and tradition!

Simple Ingredients for a Delicious Outcome

This peach crisp recipe calls for ingredients you might already have in your pantry. Fresh peaches are, of course, the star of the show. The best peaches for crisping are those that are ripe and sweet, offering that burst of flavor that contrasts beautifully with the buttery oat crumble on top.

Don't have fresh peaches? No problem! Frozen or canned peaches can work too. Just make sure to drain any excess liquid to prevent a soggy mess. Now, for the crumble topping: it's as straightforward as mixing together oats, butter, and a bit of sugar. This mixture not only adds sweetness but also provides that delightful crunch that everyone loves.

Experimenting with Flavors

While a classic peach crisp is fantastic, why not have some fun? Try tossing in other summer fruits like strawberries, blueberries, or cherries. They can add a delightful twist to the dish. You can also switch up nuts—almonds, pecans, or even pumpkin seeds will add a delightful crunch. Think of the ways these additions can elevate your crisp to make it even more special for your guests!

Perfecting Your Peach Crisp: Pro Tips

As you step into the kitchen, remember a few tips for an optimal peach crisp. Taste your peaches first to determine their sweetness. This will help guide how much sugar to add. Also, it’s important to avoid overmixing your topping; keep those small butter chunks intact for a delicious, flaky texture.

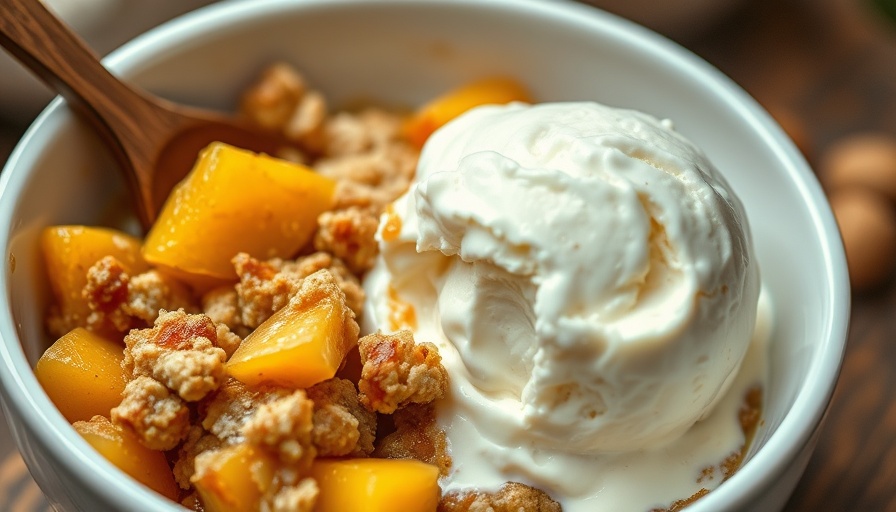
Letting your peach crisp sit for about 10-15 minutes before serving may feel like a challenge, but it’s crucial. This resting time allows the filling to thicken up, making it less messy when serving. Pair it with a scoop of vanilla ice cream or a drizzle of caramel sauce, and you've got a summertime favorite that your family will rave about!

Storing Leftovers: Make It Last!

Did you whip up too much peach crisp? No worries! Store any leftovers in your refrigerator for up to three days, or freeze them for up to four months. When you’re ready to enjoy it again, simply reheat it in the oven or air fryer for that perfect crispiness.

A Peachy Tradition

Peach crisp is more than just a dessert; it’s a way to gather family and friends, share stories, and indulge in delicious flavors. With its ease of preparation, you can involve your children in the cooking process, that way creating memories that will last a lifetime. As you prepare this dish, think of how food has a marvelous way of connecting us to our roots and traditions.

Join the Peach Crisp Movement!

As we embrace summer in southeast Michigan, let’s celebrate with food that brings joy to our tables and hearts. Bake your own peach crisp and share it with loved ones, embracing the warmth of summer and the love of family that can be found in every delicious bite. Let food be your canvas and enjoy the art of home cooking!

Food

Write A Comment

*
*
Related Posts All Posts
08.18.2025

Discover the Crispy Tater Caesar Salad: A Fun, Hearty Twist You’ll Love!

Update Introducing the Crispy Tater Caesar Salad: A Hearty Twist on a Classic! If you've ever wondered how to elevate a classic dish like Caesar salad, let me introduce you to the Crispy Tater Caesar Salad. This innovative take combines the crunchy satisfaction of tater tots with fresh greens, blackened chicken, and crispy bacon, all tossed in a creamy Caesar dressing. Perfect for a hearty lunch or light dinner, this salad promises to tantalize your taste buds and bring excitement to your table. What Makes Tater Caesar Salad So Special? At the heart of this dish is the unique use of smashed tater tots instead of traditional croutons. Why tater tots, you may ask? They not only add a surprising crunch but also bring in a cheesy, savory flavor that complements the freshness of the romaine lettuce beautifully. Plus, they make for a fun cooking experience! The crispy, cheesy texture of the tater tots provides a delightful contrast against the tangy dressing and tender chicken, making each bite a satisfying explosion of flavors. For those who love a good twist on tradition, this salad is a must-try! Ingredient Insights: Maximize Flavor on a Budget One of the best aspects of the Crispy Tater Caesar Salad is its adaptability. Here are some tips on how to get the most out of your ingredients without breaking the bank: Tater Tots: Whether you buy them frozen or make them from scratch, they are a budget-friendly ingredient that can be stored for later use. Consider using sweet potato tater tots for a healthier option! Chicken: Opt for rotisserie chicken or leftovers for a speedy meal prep. Fresh or frozen cutlets work great, too! Bacon: Instead of pre-packaged bacon bits, you can easily cook your own bacon to add a rich flavor and crispy texture. Diced ham or even turkey bacon could serve as alternatives. Dressing: Either make your Caesar dressing at home or use a store-bought one for quick assembly. A homemade dressing can enhance the salad's freshness and flavor profile. Not Just Another Salad: The Emotional Connection to Food Why is this dish so appealing? Beyond the flavors and textures, food often serves as a vessel for cherished memories and warmth. Growing up, many of us had family gatherings centered around meals that sparked joy and connection. This salad not only nourishes but can also evoke fond memories when shared with loved ones. It’s a dish that invites conversation around the table, allowing families to create their own memories while savoring delicious flavors together. Serving Ideas: Make It Your Own The beauty of the Crispy Tater Caesar Salad lies in its versatility. Feel free to modify the ingredients based on your preferences. For a bit of spice, add diced jalapeños or pickled peppers. If you want an extra crunch, shredded carrots or broccoli can also be incorporated. You can even play with seasonings to enhance the flavor further. Keep it simple, or get creative—either way, you can’t go wrong! Food Trends: Why This Dish Is Going Viral Recently, fusion dishes like the Tater Caesar Salad have gained popularity on social media platforms, particularly for their bold flavors and creative presentations. These viral food trends not only inspire home cooks but also bring joy to those who enjoy experimenting in the kitchen. The combination of comfort food with a healthy twist continues to strike a chord with many, making it an ideal choice for those looking to try something new yet comforting. Quick Steps to Make Your Crispy Tater Caesar Salad Ready to dive in? Here’s a simplified version of how to throw together this fun salad: Bake: Start by baking your tater tots until golden and crispy, then smash them slightly before combining with your chicken. Mix: In a large bowl, combine the Caesar dressing with your choice of cheese, bacon bits, and veggies. Combine: Gently fold in the crispy tater tots and romaine lettuce. Garnish: Finish with a sprinkle of parmesan cheese and cracked black pepper for that added touch! Storing and Refreshing Your Salad Have leftovers? Simply store your salad in an airtight container for up to three days. To refresh, just add some fresh romaine and a splash of dressing if it seems to have dried out. This means you can enjoy your delicious creation without waste! As we all dive into our busy lives, let’s not forget about the connections food can foster and the joy of cooking. The Crispy Tater Caesar Salad not only brings a fun twist to your plate but can also create moments of togetherness and love. Happy cooking! Are you ready to bring this new salad trend into your kitchen? Give it a try and connect with your loved ones over a heartwarming meal that’s both fun and nutritious!

08.17.2025

Master the Art of Homemade Enchilada Sauce for Flavorful Meals

Update Crafting the Perfect Enchilada Sauce: A Delicious Adventure If you’ve ever fallen in love with Tex-Mex flavors, you owe it to yourself to master a homemade enchilada sauce. Not only is it rich, smoky, and ready in just 20 minutes, but it also adds layers of savory flavor to your dishes. Once you try making it yourself, there’s no going back to the canned versions! Unpacking the Flavor Profile: What Makes This Sauce Stand Out? This enchilada sauce is a delightful blend of chili powder, garlic, cumin, and oregano. Mixed with tomato sauce and broth, the result is a savory, spicy, and earthy beauty that will elevate your meals. The unique combination of these spices means you can adjust the flavor to be just how you love it. Using Fresh Ingredients: Why They Matter When making your sauce, the foundation is simple pantry staples. You’ll want plain tomato sauce instead of paste or puree for that authentic texture. The versatility of broth is also striking—whether you have chicken, beef, or vegetable broth on hand, it’ll work like a charm! This flexibility means you can whip it up anytime without unnecessary trips to the grocery store. Customization is Key: How to Spice It Up or Down This recipe is a joy because it accommodates personal taste! Love heat? Throw in more chili powder, a pinch of cayenne, or some diced jalapeños. Prefer something milder? A splash of milk or sour cream will add creaminess while toning down the spices. Experimenting with this sauce will allow you to find your signature flavor. Versatile Uses: More Than Just Enchiladas Let’s talk practical—a homemade enchilada sauce isn’t just for enchiladas. Drizzle it over chorizo tacos, mix it in with chili cheese fries, or pour it on a baked potato heaped with cheese and sour cream. The options are endless, making it a remarkably efficient addition to your meal prep. Storage Savvy: Keeping Your Sauce Fresh One of the best parts about making your own enchilada sauce is knowing exactly what goes into it, plus its shelf life! Keep your leftovers in a mason jar in the fridge for up to 4 days, or feel free to freeze it. Use a zippered bag, remember to squeeze out the air, and you’ll have this flavorful sauce ready at your fingertips for up to four months! How to Make Enchilada Sauce: A Step-by-Step Guide 1. **Prepare a Roux**: Start by making a roux—a mixture of flour and oil in a pan. This thickens your sauce and adds depth. 2. **Whisk in Flavor**: Stir in your seasonings and combine well with the roux before adding tomato sauce and broth. Gradually add these ingredients to keep everything smooth. 3. **Simmer and Season**: Let it bubble before reducing the heat to a simmer for a few minutes. Finish by adjusting the salt and pepper according to your taste. Bringing it All Together: The Emotional Connection to Our Food Cooking enchilada sauce isn’t just about the ingredients or techniques; it’s about sharing moments of joy, love, and togetherness. Many of us have fond memories involving family meals—what better way to honor that tradition than by creating a dish from scratch? Food has the incredible power to connect us, and this sauce is a fantastic way to start your culinary journey. Remember, the goal is to create meals with intention, easy on the wallet, and packed with love. Share this delicious enchilada sauce with your family and friends, and invite them into your kitchen. Happy cooking!

08.16.2025

Create Refreshing Summer Side Dishes for Every Occasion

Update Delicious Summer Side Dishes You Can’t Miss Summer is the perfect time to indulge in fresh, vibrant flavors, especially when it comes to side dishes. Whether you’re hosting a barbecue or simply enjoying a meal outside, having the right sides can elevate your entire dining experience. Here are some delightful summer side dishes that are both easy to make and perfect for sharing with family and friends. Why Summer Sides Are Essential Summer sides are more than just accompaniments; they reflect the season's bounty. With fresh produce in abundance, like tomatoes, cucumbers, and corn, these dishes not only add flavor but also color to your table. They’re designed to complement grilled meats and light summer meals, providing a refreshing balance to heartier main courses. Classic Summer Favorites Every Home Cook Should Master When it comes to classic summer sides, a few staples have stood the test of time. Here are a few must-try recipes that will make your summer gatherings even more memorable: Coleslaw: This creamy, tangy coleslaw is perfect as a topping for sandwiches or as a side. It's easy to make ahead of time and adds a crunchy texture to your meals. Macaroni Salad: A crowd-pleaser, this pasta salad combines elbow macaroni with beautifully diced vegetables in a simple dressing. It’s a versatile dish that allows for personal touches. Baked Beans: Canned beans can be transformed into a rich, saucy dish with a few additions like bacon and spices, making them a hit at every picnic. Fresh Garden Sides: The Taste of Summer Nothing says summer quite like a bright, fresh salad. Incorporating seasonal ingredients gives your sides an extra pop of flavor and nutrition. Here are a few garden-fresh ideas: Cucumber Tomato Salad: This simple salad pairs crisp cucumbers with juicy tomatoes, making it an easy, healthy option that complements any meal. Strawberry Spinach Salad: Sweet strawberries mixed with fresh spinach, crunchy nuts, and a tangy dressing create a delightful explosion of flavors—perfect for a warm summer day. Grilled Corn on the Cob: Enhance the sweetness of corn by grilling it. Toss with butter and a sprinkle of salt to make this a summer essential. Meal Prep Benefits: Getting Ahead This Summer As a busy homeowner, meal prep can be your best friend, especially during the fast-paced summer months. Prepare sides in advance so you can spend more time enjoying your meal rather than cooking. Here’s how: Make salads a day ahead and store them in the refrigerator, keeping dressings separate until serving to prevent sogginess. Cook larger batches of baked beans or mac salads and freeze portions for future meals. Chop your vegetables like cucumbers and peppers early in the week, making it easier to toss together salads or add to snacks. Healthy Meals That Feel Indulgent Eating well during summer doesn’t mean sacrificing flavor. Opt for healthier versions of classic dishes. For example, use Greek yogurt instead of mayonnaise in your pasta salad or load up your potato salad with fresh herbs and spices instead of heavy dressings. Incorporating Budget-Friendly Ingredients Eating on a dime is achievable, even in the summer! Source fresh produce from local farmers' markets or consider growing your own herbs. Dishes like baked beans and coleslaw are not only cost-effective but also easy to make in large quantities, ensuring you feed the whole family without breaking the bank. Invite Friends and Family for a Summer Feast Summer is the time for gatherings! Invite your loved ones over for a potluck, where everyone brings their favorite summer side. It’s a great way to enjoy a variety of dishes while sharing the burden of meal prep. The more, the merrier, right? So, whether you’re sizzling steaks on the grill or preparing a picnic in the park, these summer side dishes will not only add variety to your meals but also create lasting memories with your loved ones. Happy cooking!

Terms of Service

Privacy Policy

Core Modal Title

Sorry, no results found

You Might Find These Articles Interesting

T
Please Check Your Email
We Will Be Following Up Shortly
*
*
*