Add Row
Add Element
Southeast Michigan Home and Yard Logo
update
update
Add Element
  • Home
  • Categories
    • Home
    • Yard
    • Technology
    • News
    • Food
    • Events
    • Featured

Southeast Michigan

HOME AND YARD

  • Facebook Home and Yard Page
    update
  • update
  • update
  • update
  • update
  • update
  • update
April 08.2025
3 Minutes Read

Transform Your Basement into a Man Cave, She Shed, or Family Fun Zone

Modern basement remodeling ideas with entertainment and lounge area.

Transforming Your Basement into the Ultimate Retreat: Man Cave, She Shed, or Family Fun Zone

Friends and family understand that a basement can be much more than the mundane storage space we’ve all known it to be. Homeowners in southeast Michigan, welcome to the list of creative options for transforming your basement—from a cozy nook for yourself to an exciting family fun zone.

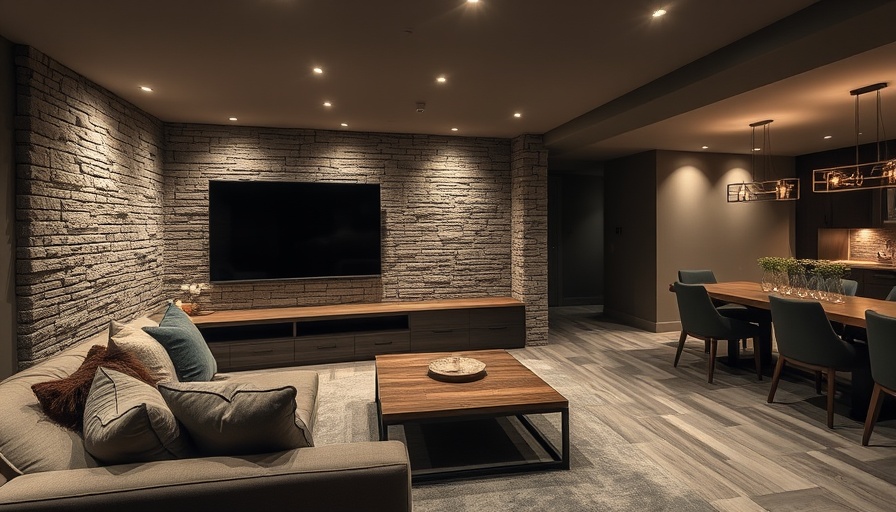
Finding Your Personal Haven: The Man Cave

A man cave is where comfort meets entertainment. Imagine this: plush recliners paired with a large flat-screen TV, surrounded by memorabilia that reflects your favorite sports teams. Consider features like a mini fridge stocked with refreshments, and perhaps even a bar setup. With the right lighting, a set of LED strips can create an inviting atmosphere to enjoy late-night gatherings with friends while watching the big game.

Why opt for a man cave? Beyond the aesthetics, this personalized space allows for unwinding away from daily stresses, making it a great retreat. Whatever hobbies entail—be it gaming, woodworking, or simply relaxing—a well-executed design can encapsulate what means most to you.

The She Shed: A Space for Creativity and Relaxation

If you believe that serenity is vital, creating an indoor she shed can be your solution. Picture a space where you can escape the hustle and bustle—complete with cozy reading nooks, vibrant plants, and bright, inviting color palettes. Whether you want to read, meditate, or explore your crafty side, the key lies in personalizing it to your taste.

Pair this with multi-functional furniture. Consider a daybed that serves as a workspace or a quiet retreat for your hobbies. This she shed can become your sanctuary, fostering creativity and mindfulness, a perfect balance for an active lifestyle!

Creating a Family Fun Zone: The Center of Togetherness

Instead of opting for a man cave or she shed, how about a vibrant family fun zone? This is where memories are made with game nights, movie marathons, and family gatherings. Envision the excitement of a ping pong table nestled under soft, colorful lighting, with space for board games and cozy seating arrangements.

Your family fun zone does not have to break the bank. Consider refurbishing existing furniture, installing new shelves for games and videos, or adding a mini-library for easy access to your family’s favorite reading materials. Involving everyone in the design process ensures a personalized touch, making your basement not just functional but fun too.

Professional Touch: The Importance of Hiring Qualified Contractors

While tackling a remodeling project can sound appealing, safety and professionalism should always prioritize. Hiring a qualified contractor can ensure your renovation is up to code, incorporates your vision accurately, and maximizes the available space. They’ll know how to navigate any local building regulations and can foresee challenges that you might miss.

It might also prevent you from biting off more than you can chew. Ensuring you find professionals familiar with basement designs specific to Michigan homes can also add immense value, as they can offer insights into making the most out of the region’s architecture.

Making It Happen: Practical Tips for Basement Remodeling

Ready to make your vision come to life? Start planning! Here’s how:

  1. Define Your Purpose: Before embarking on your project, decide on its overall purpose. Is it for relaxation, creativity, or family fun?
  2. Involve Everyone: Sit down with your family and discuss what they want from the space.
  3. Plan Your Budget: Understand the costs involved and decide what is manageable for you.
  4. Hire Professionals: Choose reputable companies with experience in basement renovations.
  5. Enjoy the Process: Keep it fun! A remodel should be a process you enjoy, not just a task to check off your list.

Let Creativity Run Wild!

Your basement can become the draw of your home; it just takes a little more thought and planning. Show your family how important their needs are while also embracing your own desires. With the right approach, your basement will be a versatile space that everyone can enjoy.

If you’re considering a basement renovation, protect your investment by choosing experienced professionals that fit your vision and budget. Don’t hesitate—take that first step towards the basement you’ve always dreamed of!

Home

Write A Comment

*
*
Related Posts All Posts
07.20.2025

Are Car Night Vision Cameras Worth It? Explore Their Safety Benefits

Update Are Car Night Vision Cameras the Future of Road Safety? If you've ever driven at night and wished for a clearer view, you might have heard about car night vision cameras. These high-tech gadgets are gaining traction in modern cars, particularly luxurious ones. But are they really worth the investment? Let's dive deeper into what they offer. Understanding How Night Vision Cameras Work Car night vision cameras, like the ones offered by Mercedes-Benz, use infrared technology to enhance visibility in low-light conditions. They provide a live feed of the dark road ahead, indicating the presence of pedestrians and other potential hazards. Unlike traditional cameras that rely on visible light, night vision systems can detect objects that emit heat, which allows them to spot pedestrians up to 80 meters away. This precision aims to give drivers advanced warning of obstacles that may be hidden in the shadows. Comparing Different Car Brands Offering Night Vision Several manufacturers, including Toyota, BMW, Lexus, and Cadillac, are now integrating night vision cameras into their vehicles. If you're not in the market for a luxury car, fear not! There are also affordable after-market options available for those keen to upgrade their current vehicle with this technology. Are Night Vision Cameras Truly Beneficial? While the technology may seem beneficial, not everyone agrees on its effectiveness. On one hand, night vision cameras can aid in accident prevention by illuminating otherwise unseen hazards. But on the other hand, industry experts like those at Kelley Blue Book caution that their utility can vary based on several factors including your driving environment and conditions. For instance, in warmer climates, ambient temperature can hinder the system's ability to detect objects accurately. Limitations and Challenges of Night Vision Technology Even with advancements in night vision technology, there are limitations. Infrared cameras may struggle with some inanimate objects like road barriers and debris, making it necessary for drivers to remain vigilant. Additionally, severe weather conditions such as rain, snow, or fog can impair the system's performance. Thus, relying solely on this technology for optimal safety might not be the best strategy. Making an Informed Decision Purchasing a vehicle equipped with night vision capabilities should come down to personal preference and driving style. Ask yourself: do you often drive at night? Are you comfortable with new technology? Understanding how this system complements your driving habits can help you decide if it's a worthwhile investment. A Look Ahead: Future Developments As technology advances, we can expect night vision systems to improve in effectiveness and affordability. This innovation may lead to even better road safety measures, reducing the number of accidents on our busy roads. In conclusion, while car night vision cameras can offer enhanced safety features, their effectiveness largely depends on individual driving environments and conditions. Consider your usual driving habits when making your decision. If you’re intrigued by the potential of your vehicle’s technology, take the time to learn more about how these cameras can be integrated into your driving experience. That way, you can fully harness the benefits they may offer!

07.18.2025

Quick DIY Tips to Repair Vinyl Plank Flooring Like a Pro

Update Understanding Vinyl Plank Flooring Care Vinyl plank flooring, a popular choice among homeowners in Southeast Michigan, is lauded for its durability and aesthetic appeal. However, like any flooring material, it can suffer from wear and tear over time. Knowing how to care for and repair your vinyl planks can extend their life significantly, keeping your home looking sharp and fresh. Essential Tools and Materials for Repairing Vinyl Plank Flooring When it comes to fixing your vinyl flooring, having the right tools is essential. Here’s what you need: Chisel Circular saw Hammer Oscillating saw with plunge blade Pencil Pry bar Pull bar Rubber mallet Straightedge Utility knife Finish nails Replacement plank Superglue Gathering these will set you up for success! Method 1: Replace a Damaged Plank with Ease High-quality vinyl planks are designed for easy repairs, especially when it comes to replacing a damaged plank. Follow these steps to replace a plank: Remove the baseboard: Carefully score the top edge with a utility knife to break the bond with the wall paint. Gently remove the baseboard using a hammer and pry bar. Pry up the damaged floor: Begin at the corner where the last piece was installed, using your pry bar to pop it up. This process is usually straightforward in smaller rooms but may require professional help in larger spaces. This method maintains the integrity of your floating floor and ensures a seamless look after the repair. Alternative Repair Method: Glue Down If your flooring isn’t of high quality and can’t be unclicked, a glue-down technique can be used. However, this approach changes your flooring style from floating to glued down, which might lead to issues later on: Cut out the damaged plank carefully. Modify your replacement piece to fit snugly. Apply superglue and set the plank in place. While not ideal, this quick fix might get you through until you can replace the flooring entirely. Future Care Insights: Keeping Your Vinyl Flooring Pristine To avoid needing repairs in the future, ensure you maintain your vinyl flooring diligently. Regular cleaning using non-abrasive cleaners and protective mats in high-traffic areas can greatly reduce wear. Knowing how to repair your vinyl plank flooring not only saves time but also keeps your home looking its best. While some jobs can be handled as a DIY project, always consider the size and complexity of the task at hand. Ultimately, balancing DIY repairs with professional help ensures longevity and quality in your home improvement projects.

07.17.2025

Master Heat Pump Thermostat Wiring: A DIY Guide for Homeowners

Update Understanding Heat Pump Thermostat Wiring Wiring a heat pump thermostat may sound intimidating, but it's a task that many homeowners in Southeast Michigan can tackle on their own. With a few simple tools and a bit of guidance, you can upgrade your HVAC system’s functionality and efficiency by replacing that old thermostat. Essential Tools and Materials Before diving into wiring, gather the necessary tools: Marker for labeling Non-contact voltage tester Phillips and flathead screwdrivers Wire strippers You'll also need a new heat pump thermostat, electrical tape or masking tape, and mounting screws. Having everything in one place will make the process much smoother. Step-by-Step Instruction for Wiring Your New Thermostat Ready to replace that old thermostat? Follow these simple steps: 1. Turn Off the Power The first and most crucial step is ensuring your safety. Locate the disconnect switch for your HVAC system or turn off the circuit breaker to prevent any electrical mishaps. Remember, safety first! 2. Verify the Wiring Next, carefully remove the existing thermostat's faceplate. Use your non-contact voltage tester to confirm that no power is flowing to the thermostat. Take a photograph of the existing wiring so that you can easily replicate the setup. 3. Remove the Old Thermostat Gently remove the wires from the terminal block, labeling them with pieces of tape if desired. Once all wires are detached, unscrew the thermostat from the wall and set it aside. 4. Attach the New Thermostat Thread the thermostat wires through the base of your new thermostat. Level it on the wall and secure it with the provided screws. Then, attach the wires to their respective terminals as noted in your earlier photo. Common Misconceptions About Thermostat Wiring One might think that thermostat wiring is a task only for professionals, but that's a misconception. Many homeowners are perfectly capable of wiring their thermostats, provided they follow clear instructions. Dismissing DIY projects denies you the chance to save money and gain new skills! The Value of Tackling This DIY Project Replacing your thermostat can significantly enhance your home's heating efficiency. A modern, smart thermostat could lead to energy savings and greater control over your home's environment. It’s a relatively inexpensive upgrade that pays dividends in comfort and energy costs! Why Knowing This Information Matters For homeowners in Southeast Michigan, understanding how to wire your heat pump thermostat can empower you to make quick fixes yourself, fostering a more self-sufficient lifestyle. Not only does this enhance your home, but it also builds confidence in managing your property’s upkeep. Now, are you feeling more confident about taking on this thermostat wiring task? If you enjoy DIY projects around the house, keep learning and trying new things. Remember, if ever all else fails, there’s no shame in calling in a professional!

Terms of Service

Privacy Policy

Core Modal Title

Sorry, no results found

You Might Find These Articles Interesting

T
Please Check Your Email
We Will Be Following Up Shortly
*
*
*