Add Row
Add Element
Southeast Michigan Home and Yard Logo
update
update
Add Element
  • Home
  • Categories
    • Home
    • Yard
    • Technology
    • News
    • Food
    • Events
    • Featured

Southeast Michigan

HOME AND YARD

  • Facebook Home and Yard Page
    update
  • update
  • update
  • update
  • update
  • update
  • update
June 13.2025
4 Minutes Read

Unlock The Secrets of Juicy Air Fryer Whole Chicken!

Golden air fryer whole chicken recipe on platter garnished with lemon.

SEO Keyword: Discover the Magic of Air Fryer Whole Chicken

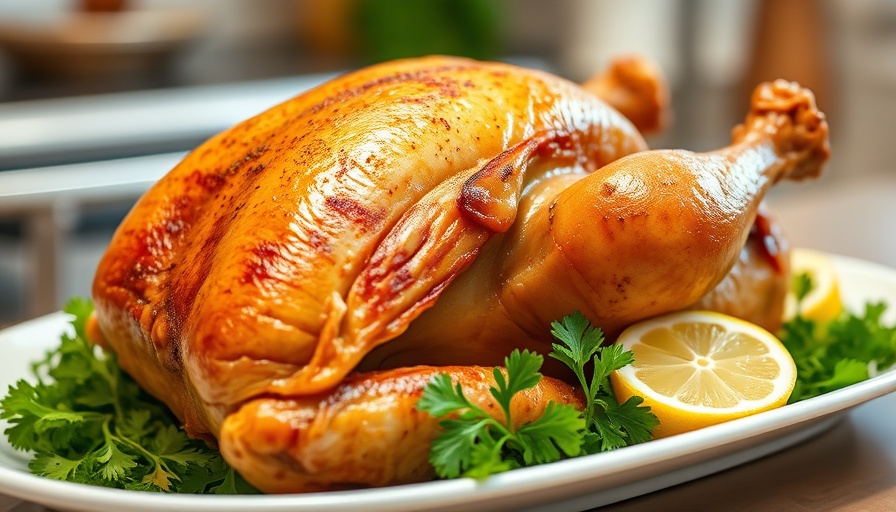
When it comes to whipping up a delicious meal with minimal effort, nothing beats the air fryer technique. Particularly when combined with a whole chicken, the air fryer transforms the cooking experience and offers a juicy, flavorful result that will leave everyone at the dinner table craving more. In this article, we’ll explore the steps to make an irresistible air fryer whole chicken, inspired by the video titled Juicy & Easy Air Fryer Whole Chicken Recipe.

In 'Juicy & Easy Air Fryer Whole Chicken Recipe', the discussion dives into delicious and straightforward cooking techniques, exploring key insights that sparked deeper analysis on our end.

A Simple Yet Flavorful Rub

The secret to achieving that perfect crispy skin and mouthwatering flavor is all in the rub. Using kosher salt, black pepper, paprika, garlic powder, and Italian seasoning, you create a blend that infuses the chicken with taste while enhancing its natural juiciness. Not only are these ingredients commonly found in your pantry, but together they create a balanced flavor profile that complements the chicken beautifully.

To make the rub, simply mix the spices together in a bowl. Pat your chicken dry with a paper towel to ensure that the rub sticks effectively, and then coat the chicken generously with olive oil. This not only helps the spices adhere but also promotes that crispy finish. Gently massage the rub into the chicken’s skin, making sure that every nook and cranny is covered. This attention to detail makes a marked difference in the final outcome, elevating your dish from good to exceptional!

The Air Frying Process

Once your chicken is prepped with the rub, it’s time for the air fryer! Preheat your air fryer if required and place the chicken inside, cooking it initially at 350°F for about 30 minutes. This starting point allows the spices to begin developing their flavors while the chicken starts to cook through. After the first half-hour, flip the chicken over to ensure even cooking and allow it to reach its full juiciness and flavor. Cook for an additional 30 to 35 minutes, or until the internal temperature reads at least 165°F. This process not only guarantees tenderness but also creates a golden, beautifully crisp skin that’s simply irresistible.

Why The Air Fryer? Insights into Healthier Cooking

One of the biggest draws to using the air fryer for cooking is its ability to produce crispy, mouthwatering results while using significantly less oil compared to traditional frying methods. For those focused on healthier eating, this means enjoying the rich flavors of fried food without excessive fat. The air fryer circulates hot air around the food, which mimics the deep-fried experience, giving that sought-after crunch while keeping it healthier.

Furthermore, cooking your whole chicken in the air fryer can lead to a more energy-efficient process, cooking faster than a conventional oven while using less electricity. This is a win-win for both your health and your utility bills!

Enhancing Your Air Fryer Experience: Tips and Tricks

If you want to take your air fryer whole chicken to the next level, consider these added tips:

  • Marinate the Chicken: For an elevated flavor, marinate your chicken overnight with the rub. This allows the spices to penetrate deeper, enhancing the taste to new levels.
  • Add Lemon or Herbs: Place some lemon slices or fresh herbs inside the cavity to impart additional flavors while cooking. This aromatization can provide a refreshing taste that complements the rub.
  • Utilize Vegetables: You can cook vegetables alongside the chicken in the air fryer. Toss some potatoes or carrots in olive oil and spices, and place them at the base of the fryer. As your chicken cooks, these veggies become flavorful and tender.

Get Ready to Cook!

Now that you know how to prepare a juicy and easy air fryer whole chicken, get ready to impress your family or friends at your next meal. The simplicity, flavor, and health advantages make this a winning recipe for any occasion.

Whether you're a seasoned chef or a beginner in the kitchen, the air fryer opens a world of culinary possibilities that are both healthy and satisfying. Explore the delights of this modern kitchen tool, and share your experiences with family and friends. Don’t forget to tag us and let us know how your air fryer chicken turns out!

If you’re looking for delicious recipes and healthy living tips, stay tuned for more insights that can inspire your cooking adventures. Embrace the flavor and fun that comes with healthy meal preparation!

Food

Write A Comment

*
*
Related Posts All Posts
07.29.2025

How to Make Easy Weeknight Stuffed Peppers for Healthy Meal Prep

Update Colorful and Cozy: The Appeal of Stuffed Peppers Stuffed peppers are not just a meal; they’re a canvas for creativity in the kitchen. Imagine biting into a tender bell pepper, bursting with flavors of ground meat, savory spices, and melted cheese. For homeowners in Southeast Michigan looking to elevate their weeknight dinners, this classic dish is not only a feast for the eyes but also a heartwarming supper that’s perfect for the entire family. Simple Steps to Savoring Stuffed Peppers Making stuffed peppers is an easy yet satisfying process. First, you’ll want to brown your meat, usually a combination of ground beef and Italian sausage. The aroma filling your kitchen is sure to entice everyone in the household. Next, you’ll mix in your uncooked rice, tomato sauce, and seasonings, allowing the flavors to blend as the rice cooks. As a preparation tip, simmer your bell peppers for a few minutes to soften them. This little step goes a long way in achieving that perfect tender bite when baked. Meal Prep: A Budget-Friendly Solution One of the best parts about stuffed peppers is their suitability for meal prep. You can freeze them before baking, making batch cooking a breeze. Simply prepare the filling, stuff the peppers, and freeze them in a tightly sealed container. On busy weeknights, just thaw them and pop them in the oven—dinner is ready in no time! For those monitoring their budgets, consider substituting some of the meat with beans or extra vegetables. This not only stretches your ingredients but also boosts the nutritional profile of your meal. Cooking with Love: Connecting through Food Food has a unique way of connecting us, especially when it comes to preparing dishes that conjure up family memories. Growing up, my grandmother always believed that cooking is a form of love. This belief fuels my passion for food. Making stuffed peppers can be a bonding activity—invite your kids to help fill the peppers, teaching them about different ingredients and spices. When they help create the meal, they’re more likely to enjoy it! Creative Variations for Every Palate While the classic stuffed pepper recipe is a crowd-pleaser, don’t hesitate to play around with flavors. Try adding black beans for a Tex-Mex twist or Italian seasoning for an Italian flare. You can even try incorporating grains like quinoa for a nutrient boost or cooking the rice in vegetable broth to enhance flavor. The possibilities are endless! Healthy Eating: Making Comfort Food Guilt-Free Caring for our health doesn’t have to mean sacrificing flavor. With stuffed peppers, you can make hearty and healthy meals. Opt for lean ground turkey or chicken, and load up on veggies like chopped spinach or mushrooms in the filling. Not only do these additions cut calories, but they elevate the taste and texture of your dish. Plus, using whole grain rice instead of white rice can add fiber and additional nutrients, creating a meal that is both comforting and wholesome. Practical Storing Tips: Keeping It Fresh Leftover stuffed peppers can last up to four days in the fridge when stored in an airtight container. They are perfect for re-heating at lunchtime or as a quick dinner option. For longer storage, freeze them before baking. Just remember to thaw overnight in the fridge and add 15 minutes to the baking time. Following these simple storage tips can ensure you enjoy your delicious peppers without waste. Quick-Tips Summary for Successful Stuffed Peppers Use any color of bell peppers—green for a more earthy flavor or red for sweetness. Mix different proteins—don’t be afraid to experiment with ground turkey or vegetarian meats. Incorporate additional vegetables for added texture and flavor. Store stuffed peppers appropriately to maximize freshness. Cooking can feel overwhelming, especially for busy professionals and parents. But with easy, delicious recipes like stuffed peppers, you can create meals that are quick, budget-friendly, and most importantly, packed with love. Get into the kitchen and prepare this classic dish that brings family and friends together around the dinner table! Now that you're equipped with all these tips and tricks on making stuffed peppers, grab your ingredients, round up your loved ones, and embark on your cooking adventure. With every bite, you’ll not only satisfy hunger but also nourish connections and create lasting memories in your home.

07.28.2025

Transform Your Meals with Delicious Homemade Sun-Dried Tomatoes!

Update Unlock the Flavor: Homemade Sun-Dried Tomatoes in Your Kitchen Have you ever tasted sun-dried tomatoes that are rich, smoky, and bursting with flavor? Making your own sun-dried tomatoes at home can elevate your meals while saving you money. With just a few simple ingredients and some patience, you can transform fresh tomatoes into a delightful pantry staple that enhances any dish. What Makes Homemade Sun-Dried Tomatoes Special? Sun-dried tomatoes are not just a fancy ingredient but a versatile addition to any kitchen. When prepared at home, they allow you to control the salt, oil, and additional seasonings, ensuring they meet your taste preferences. Imagine using sweet, fresh tomatoes that you can slice and season just the way you like. The process makes the tomatoes chewy and concentrated in flavor—perfect for pasta dishes, salads, and even as a snack! Getting Started: Choosing the Right Tomatoes To achieve the best results, select meaty tomatoes with less moisture, such as Roma or Campari. These varieties hold up well when dried and provide a concentrated flavor. When you're standing in the store aisle, look for tomatoes that are firm and have vibrant skin to ensure you’re getting the freshest produce possible. Easy Steps to Create Your Own Sun-Dried Tomatoes The beauty of this recipe lies in its simplicity. All you need to do is: Cut the tomatoes in half and place them on a baking sheet. Toss them with olive oil, salt, and any spices you love—think basil or thyme! Bake them slowly until they’re beautifully dried, flipping them halfway through. With a cooking time of about six hours, you can go about your day while they roast away in the oven, filling your home with a delicious aroma. The Importance of Storage Once your sun-dried tomatoes are ready, the next step is storage. Ensure you let them cool completely before transferring them into a sealed jar. Cover them with olive oil and inject some fresh herbs if you wish! This method not only enhances flavors but also helps them last longer—up to two weeks in the refrigerator or twelve months in the freezer. Ways to Use Your Sun-Dried Tomatoes These flavorful delights can be incorporated into various recipes, adding a unique punch to your meals: Sun-Dried Tomato Pasta: Toss them into pasta dishes alongside your favorite proteins for hearty meals. salads: Mix them into salads for added depth of flavor. Sandwiches & Wraps: Use them in sandwiches to elevate the mundane lunch. Dips: Blend them into dips mixed with cream cheese or sour cream for a crowd-pleasing appetizer. These ideas are just the beginning! The versatility of sun-dried tomatoes makes them a fantastic ingredient to experiment with in your kitchen. Culinary Tips from the Pros For those looking to master their sun-dried tomato game, consider these pro tips: Use parchment paper on your baking sheets to make clean-up a breeze. Slice your tomatoes uniformly for even cooking and drying. If you notice they’re starting to smell rancid or have any mold, it's best to discard them to avoid any health risks. Why Home Cooking Matters Engaging in home cooking, particularly with recipes like sun-dried tomatoes, connects you with your food, promotes healthier eating habits, and saves you money. As we navigate busy schedules, the value of creating quick yet delicious meals becomes essential, offering comfort and satisfaction right in your own kitchen. Let’s Wrap it Up! Embrace the joy of cooking by making these sun-dried tomatoes! Not only will you enjoy a delicious product, but you'll feel great about crafting something with your own hands. Why not take a step today and try this simple yet rewarding recipe? Dive into your kitchen, gather those tomatoes, and let's get drying!

07.27.2025

Explore Fresh & Crunchy Noodle Salad: A Flavor-Packed Meal Prep

Update Elevate Your Meals with a Fresh Noodle Salad Welcome to the world of tasty, vibrant food where every meal is an invitation to delight! If you're looking for a quick, healthy, and budget-friendly dish that’s bursting with flavor, this fresh and crunchy noodle salad is just the ticket. Perfect for busy families in southeast Michigan, this recipe combines Asian-inspired ingredients that you can whip up in no time. What's in This Delicious Salad? This noodle salad features rice noodles, cooked chicken, an assortment of colorful veggies, and toasted nuts all tossed together in a delightful sesame ginger dressing. It's fresh, fast, and truly meal-prep friendly—a huge win for any homeowner aged 30 to 65 looking for delicious meals without the hassle of long prep times! Ingredient Insights: The Heart of the Dish Want to customize your noodle salad? Here are a few tips. Rice noodles can be easily substituted with ramen noodles or even angel hair pasta if that's what you have handy. For your protein, leftover grilled chicken or rotisserie chicken works wonders and cuts down on cooking time. Don’t forget the veggies! Bok choy, cucumbers, and peppers add a delightful crunch and vibrant color to the dish. If you're feeling adventurous, toss in water chestnuts or edamame for added texture! Nuts and Seeds: Enhance the Crunch! Adding nuts like slivered almonds or peanuts could truly elevate your dish. If nut-free is the way to go, consider sunflower or pumpkin seeds sprinkled on top. These little additions not only boost the flavor; they also contribute a satisfying crunch that complements the soft noodles. Whipping Up Your Noodle Salad: Step-by-Step Recipe Creating this noodle salad is a breeze! Start by cooking and rinsing your rice noodles in cold water, which stops the cooking process and prevents stickiness. Then, combine the noodles with your veggies, chicken, and dressing. A tip? Let your salad chill in the fridge for about an hour before serving to really meld the flavors. Storage Solutions: Keeping Your Salad Fresh Got leftovers? Keep your noodle salad stored in a covered container in the fridge for up to four days. Just give it a stir, and if needed, a splash of fresh dressing before serving! This way, you can enjoy the flavors without worrying about spoilage, aligning perfectly with those meal prep goals. Budget-Friendly Meal Prep: Noodle Salad for Everyone Incorporating healthy meals into your week doesn’t have to break the bank! By choosing seasonal vegetables and planning ahead, you can create a meal that is not only nutritious but kind to your wallet. Paired with some crunchy fried wontons or soy ginger steak bites, this noodle salad becomes a centerpiece meal that is sure to impress. Let’s Talk Variations: Personalizing Your Salad Feeling like shaking things up? Add a spoonful of peanut butter for a creamier dressing, or a hint of sriracha or gochujang for heat. These small tweaks can transform a light salad into a rich, hearty dish that suits any craving. Final Thoughts: A Recipe for Connection Food brings us together, and this fresh and crunchy noodle salad is no exception. It's easy to prepare and adaptable, making it not just a meal but a way to enjoy time with family and friends around the table. Ready to give this noodle salad a try? Head to your kitchen and gather those ingredients. You might just discover your new favorite dish that will make meal prep a joyous part of your week!

Terms of Service

Privacy Policy

Core Modal Title

Sorry, no results found

You Might Find These Articles Interesting

T
Please Check Your Email
We Will Be Following Up Shortly
*
*
*