Add Row
Add Element
Southeast Michigan Home and Yard Logo
update
update
Add Element
  • Home
  • Categories
    • Home
    • Yard
    • Technology
    • News
    • Food
    • Events
    • Featured

Southeast Michigan

HOME AND YARD

  • Facebook Home and Yard Page
    update
  • update
  • update
  • update
  • update
  • update
  • update
Add Row
Add Element
July 16.2025
3 Minutes Read

Get Creative with DIY Halloween Door Decorations for Fun 2025!

DIY Halloween door decorations with pumpkins, lanterns, and a spider.

DIY Halloween Door Decorations: Unleash Creativity this Halloween

As the Halloween spirit begins to creep in, homeowners in Southeast Michigan have the perfect opportunity to make their front doors stand out with creative and festive decorations. Whether you're looking for something spooky, fun, or downright classic, you've got plenty of simple DIY options that won't break the bank. This Halloween, let your door be the spotlight of your holiday decor!

Witching Your Entryway

Transform your front door into a scene from a witch's setting. Gather three large pots and fill them with dried stems, representing the witch's magical ingredients. You can also add decorative bats and a life-sized statue of a black cat to further enhance the witch aesthetic. A few thick books with mysterious covers can be scattered near the pots to evoke curiosity. For a playful touch, grab a witch costume and stand at the door handing out treats—just don’t forget to hang some witch hats!

Glowing Lantern Pumpkins

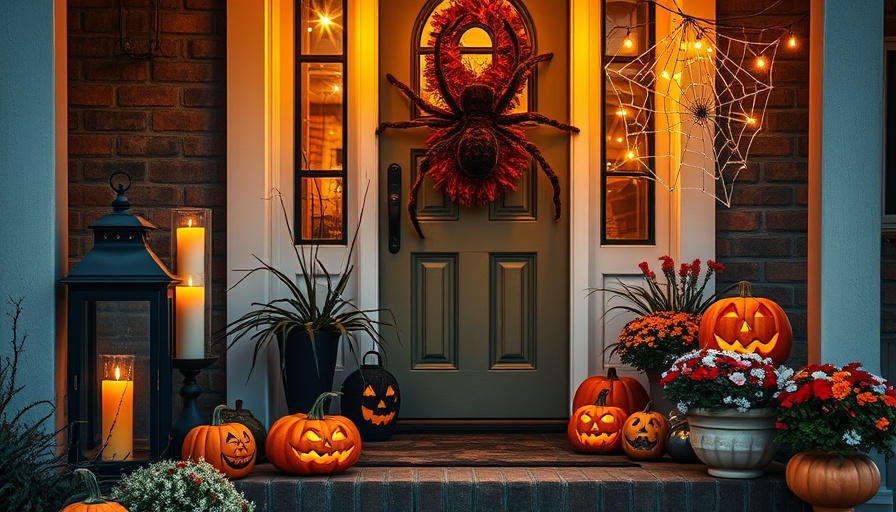
You can’t talk Halloween without mentioning pumpkins! Carve out a few pumpkins, place candles or lanterns inside, and position them around your door. To add an element of fright, consider placing a fun yet scary skeleton nearby and a simple speaker to play eerie sounds as trick-or-treaters approach. The glowing pumpkins will not only welcome guests but also set a spooky tone for the evening.

Creating a 'Prohibited Zone'

Inject some humor and trickery into your decorations with a 'Prohibited Zone' sign. You can easily make this by writing spooky phrases like "Keep Out!" or "Do Not Enter" onto cardstock and attaching them to your door. Add to the effect by wrapping white net fabric around your door lamp to mimic spider webs, and sticking bats around. This combination will definitely catch the eyes of children and adults alike.

The Classic Black Cat

The black cat has long been associated with Halloween. To make your door a sleek black silhouette, paint it or use black wallpaper. Then, you can cut out the shape of a cat and stick cat ears and a tail out from the door frame. This simple yet effective DIY project can easily be a fun family activity, bringing everyone into the Halloween spirit!

Multi-Eyed Monster Madness

This year, skip the traditional designs and instead go for a quirky multi-eyed monster! Use green wallpaper as a base for your door and create cut-outs of eyes, mouths, horns, and claws to stick on the door. Your monster will look playful and comical rather than frightening, making it a fantastic decoration for a family-friendly atmosphere. Get creative with the colors and expressions to add personality!

Encouraging Kids’ Creativity

Involve the kids in the decoration magic—hand them the reins and let them craft their own Halloween door decor. With your guidance, they can create elements like carved pumpkins, ghost emojis, and a bright yellow full moon. This fun activity will help ignite their creativity, provide bonding moments, and result in unique decorations that they’ll cherish every Halloween.

Welcome to Your 'Skelentrance'

Stir excitement in your visitors with a clever 'Skelentrance!' This idea involves creating a skeleton-themed decor where a skeleton is positioned near or on your door. You can also enhance this theme by placing skeleton-themed decor elements around your entrance to create a unified spooky look. Be sure to secure all items well to face the wind and prevent any mishaps that could detract from your festive decor.

As you embark on your Halloween door decoration journey, remember that the goal is to get creative and infuse fun into your home. Engaging your family in DIY crafts will not only give you memorable experiences but also create a welcoming atmosphere for trick-or-treaters. With a mix of spooky and playful designs, your doorway will surely provide the right ambiance for the exciting Halloween season. So gather your materials and get started! Happy decorating!

Home

Write A Comment

*
*
Related Posts All Posts
07.17.2025

Master Heat Pump Thermostat Wiring: A DIY Guide for Homeowners

Update Understanding Heat Pump Thermostat Wiring Wiring a heat pump thermostat may sound intimidating, but it's a task that many homeowners in Southeast Michigan can tackle on their own. With a few simple tools and a bit of guidance, you can upgrade your HVAC system’s functionality and efficiency by replacing that old thermostat. Essential Tools and Materials Before diving into wiring, gather the necessary tools: Marker for labeling Non-contact voltage tester Phillips and flathead screwdrivers Wire strippers You'll also need a new heat pump thermostat, electrical tape or masking tape, and mounting screws. Having everything in one place will make the process much smoother. Step-by-Step Instruction for Wiring Your New Thermostat Ready to replace that old thermostat? Follow these simple steps: 1. Turn Off the Power The first and most crucial step is ensuring your safety. Locate the disconnect switch for your HVAC system or turn off the circuit breaker to prevent any electrical mishaps. Remember, safety first! 2. Verify the Wiring Next, carefully remove the existing thermostat's faceplate. Use your non-contact voltage tester to confirm that no power is flowing to the thermostat. Take a photograph of the existing wiring so that you can easily replicate the setup. 3. Remove the Old Thermostat Gently remove the wires from the terminal block, labeling them with pieces of tape if desired. Once all wires are detached, unscrew the thermostat from the wall and set it aside. 4. Attach the New Thermostat Thread the thermostat wires through the base of your new thermostat. Level it on the wall and secure it with the provided screws. Then, attach the wires to their respective terminals as noted in your earlier photo. Common Misconceptions About Thermostat Wiring One might think that thermostat wiring is a task only for professionals, but that's a misconception. Many homeowners are perfectly capable of wiring their thermostats, provided they follow clear instructions. Dismissing DIY projects denies you the chance to save money and gain new skills! The Value of Tackling This DIY Project Replacing your thermostat can significantly enhance your home's heating efficiency. A modern, smart thermostat could lead to energy savings and greater control over your home's environment. It’s a relatively inexpensive upgrade that pays dividends in comfort and energy costs! Why Knowing This Information Matters For homeowners in Southeast Michigan, understanding how to wire your heat pump thermostat can empower you to make quick fixes yourself, fostering a more self-sufficient lifestyle. Not only does this enhance your home, but it also builds confidence in managing your property’s upkeep. Now, are you feeling more confident about taking on this thermostat wiring task? If you enjoy DIY projects around the house, keep learning and trying new things. Remember, if ever all else fails, there’s no shame in calling in a professional!

07.17.2025

What Homeowners in Michigan Need to Know When Hiring Contractors

Update Understanding Your Home Renovation Needs With more time spent indoors than ever, many of us have started thinking creatively about our living spaces. Whether it's a cozy nook or a full kitchen remodel, home renovations have seen a significant uptick. However, tackling these projects can overwhelm anyone. That’s where hiring the right independent contractor comes in, ensuring your vision becomes a reality without the headaches. Are They Qualified to Transform Your Space? The crucial first step in hiring an independent contractor is verifying their qualifications. While stepping into a new renovation might sound exciting, it's vital that your contractor is well-equipped for the job. An excellent way to gauge this is through their online presence. Review their website showcasing past projects, client testimonials, and qualifications. This will provide insights into their capability and professionalism. In addition to their website, social media platforms can offer a glimpse into their recent works and client interactions. Homeowners might find comfort in seeing how a contractor handles feedback. Essentially, don’t shy away from asking them about their licenses and training. Licensed contractors typically carry a sense of commitment and professionalism that can minimize your worries during the renovation process. Do They Align with Your Vision? After confirming they are qualified, it's crucial to find out if they see the world the same way you do. A great contractor will invest time in understanding your vision. They should be eager and able to visualize the bigger picture of your desires, whether it’s an open concept kitchen or a luxurious spa-like bathroom. Discuss your ideas openly – whether inspired by designs from Pinterest or recent home improvement shows. The goal is a healthy collaboration, ensuring both parties are on the same page before diving into the project. Budgeting: What Can You Afford? Budgeting for renovations can be daunting but breaking it down can help ease the burden. Make a list of priorities for your home transformation. You might want to transform your kitchen today, while a new bathroom can wait. This prioritization not only helps your contractor estimate costs accurately but also allows you to allocate your resources effectively. When discussing budget with potential contractors, don’t merely look for the lowest bid. Instead, consider their overall value: how they align with your vision, their qualifications, and their communication style. An independent contractor who understands your objectives could ultimately save you money by doing the job right the first time. The Importance of References Before finalizing your contractor, ask for references from prior clients. Speaking with previous customers offers valuable insights into their experiences. Ask about communication, reliability, and quality of work. A satisfied client’s recommendation can often help alleviate concerns about moving forward. Checking Reviews and References Online reviews can also play a significant role in determining whether a contractor is the right fit for your project. Platforms like Google, Yelp, and even Facebook can give you a good idea of the contractor’s reputation. Focus on the details given in the reviews - responsiveness, quality of work, and overall satisfaction - as these can highlight their strengths and weaknesses. Getting Everything in Writing Once you decide on a contractor, it’s time to put everything in order. Ensure you have a clear, detailed contract that outlines the project scope, timeline, and payment schedule. This document provides essential protection for both you and the contractor, minimizing misunderstandings. Consider Local Expertise Especially for homeowners in southeast Michigan, hiring a contractor familiar with local building codes and styles is essential. They can navigate the regulations and even provide insight into popular home improvement trends in your area. This local knowledge can provide additional value that online-only contractors may not offer. Your Next Steps With a clearer understanding of what to look out for when hiring an independent contractor, you're better prepared to enhance your home. Remember that this is a partnership, and ensuring both sides are aligned helps tremendously. Start your project with confidence, and enjoy the transformation.

07.16.2025

Spot and Avoid Sneaky Car Subscription Services: A Homeowner's Guide

Update Understanding Car Subscription Services As car ownership evolves, one of the latest trends is the advent of car subscription services. These services, which allow consumers to pay a monthly fee for access to the vehicle and certain features, are gaining popularity among manufacturers looking to capture new revenue streams. Why the Hype? Fans argue that these services provide flexibility. For instance, you might only want heated seats during the frosty Michigan winters without paying extra during the summer. However, skeptics point out that many features are already built into the cars and charging extra feels unfair. The Pricing Dilemma The cost associated with car subscription services can vary significantly. For instance, some services charge you separately for features that may already be standard in your vehicle—like remote start or vehicle tracking. While remote start might cost around $35 per year with Mercedes, you could be looking at $105 or more with BMW, which raises eyebrows over the practicality versus the expense. Car Subscription Features to Know About Let’s dive into a few key features that many car brands are offering through their subscription services: Remote Start: Ideal for Southeast Michigan winters, this feature allows you to warm up your car before getting in. However, subscriptions may be the only way to access this feature despite its presence in the car. Vehicle Locating and Tracking: Have you ever forgotten where your car is parked? With an accompanying app, this feature helps you find your vehicle, typically costing between $10 to $25 a month. Drive Recorder: Need to document your road trips? A drive recorder might appeal to you, although pricing will vary based on the features and services included. Available Brands and Their Pricing Brands such as Audi, Kia, and Tesla all offer varying subscription services with unique features. For practical homeowners in Southeast Michigan considering new vehicles, it’s essential to weigh these subscription options against traditional financing or leasing methods. Should You Subscribe? Key Takeaways While car subscription services present an alluring option, it's crucial to dissect what you're genuinely paying for. Ask yourself whether these add-ons enhance your driving experience enough to justify their costs. Researching and comparing different subscription options can save you both money and frustration down the road. DIY Considerations Owning a vehicle should empower you, not complicate your life. If you find subscription services overwhelming, consider DIY solutions or consulting with a local mechanic or handyman expert who can guide you on what features are truly necessary for your lifestyle. In this ever-evolving vehicle landscape, it's vital to stay informed and proactive. Consider your driving needs and budget carefully before jumping into the subscription craze. Keep in mind that while many of these subscriptions offer appealing features, they may not always deliver value in line with their costs. Want to learn more about effective home and auto solutions? Stay tuned for more insights on managing your home and vehicles effectively!

Add Row
Add Element
cropper
update

Southeast Michigan

Home and Yard

cropper
update

Covering everything from local real estate updates and home improvement advice to seasonal lawn care tips and regional events, our site keeps you informed and inspired.

  • Facebook Home and Yard Page
    update
  • update
  • update
  • update
  • update
  • update
  • update
Add Element

COMPANY

  • Privacy Policy
  • Terms of Use
  • Advertise
  • Contact Us
  • Menu 5
  • Menu 6
Add Element

(269) 359-3322

AVAILABLE FROM 8AM - 5PM

Portage, Michigan

Add Element

ABOUT US

Southeast Michigan Home and Yard is a produced by Ingenuic Media Group. 


Ingenuic Media Group promotes local businesses through media promotion and digital marketing.

Add Element

© 2025 CompanyName All Rights Reserved. Address . Contact Us . Terms of Service . Privacy Policy

Terms of Service

Privacy Policy

Core Modal Title

Sorry, no results found

You Might Find These Articles Interesting

T
Please Check Your Email
We Will Be Following Up Shortly
*
*
*