Add Row
Add Element
Southeast Michigan Home and Yard Logo
update
update
Add Element
  • Home
  • Categories
    • Home
    • Yard
    • Technology
    • News
    • Food
    • Events
    • Featured

Southeast Michigan

HOME AND YARD

  • Facebook Home and Yard Page
    update
  • update
  • update
  • update
  • update
  • update
  • update
May 11.2025
3 Minutes Read

Mastering the Art of Drywall Anchors: Your Ultimate Guide

Assorted drywall anchors for choosing drywall anchors.

Understanding Drywall Anchors: The Essentials

When it comes to hanging objects securely on drywall, knowing the ins and outs of drywall anchors is crucial. For homeowners in Southeast Michigan, this knowledge can save you from costly accidents and help you achieve a flawless finish on your projects. Whether you’re constructing a new shelf for your favorite books or securing a stunning piece of artwork, the type of drywall anchor you use will determine how well your projects hold up over time.

The Three Main Types of Drywall Anchors

There's a range of drywall anchors, each designed for different applications. Let’s break down the most common types:

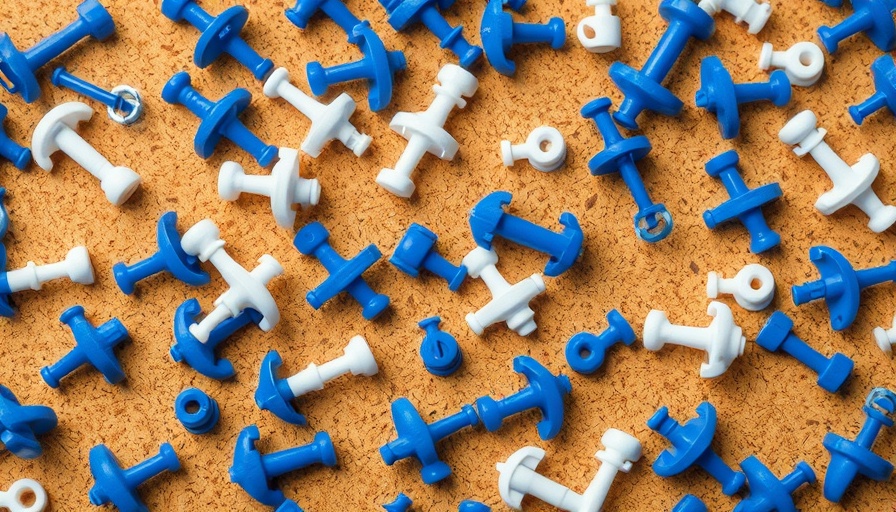
Plastic Expansion Anchors

Plastic expansion anchors are your go-to for light duties, with weight limits ranging from 5 to 25 pounds. These simple, cylindrical anchors are pushed into pre-drilled holes and expand when a screw is tightened, creating a firm grip in drywall. They are lightweight, easy to install, and perfect for hanging pictures or decorative items.

Molly Bolts

Molly bolts are more versatile, supporting weights of 25 to 50 pounds. These anchors feature a unique design with folds that spread the load against the drywall surface. After inserting the anchor into a pre-drilled hole and tightening the screw, the sleeves expand, ensuring a strong hold. One of the best things? You can remove and replace the screw without losing the anchor — a feature most handy for overhauls and seasonal changes.

Threaded Drywall Anchors

For the most robust solutions, consider threaded anchors that screw directly into the drywall. They hold an impressive 25 to 75 pounds. Unlike other types that require pre-drilling, these self-tapping anchors bite right into the drywall and can be easily installed with a screwdriver. They provide a solid hold for heavier items like TVs and bigger shelves.

Choosing the Right Anchor for Your Project

Before you dive into your project, weigh the item you're hanging. It’s best practice to select an anchor rated to hold 25 to 50 percent more than the object’s weight. For example, if your mirror weighs 10 pounds, opt for an anchor that can bear 12 to 15 pounds. This ensures safety and prevents damage to your walls.

Why Getting It Right Matters

Incorrectly choosing an anchor can lead to disastrous results, such as broken items and even personal injury. As a seasoned handyman who values DIY integrity, I stress the importance of proper anchor selection. Picture your new 60-inch TV tumbling from the wall — that’s a heartbreak you can avoid with the right tools and know-how!

It’s Better To Ask For Help

If you're tackling a large or critical job and feel unsure, don't hesitate to reach out to a professional. Sometimes, safety is worth investing in a helping hand. Remember, getting your home projects right isn’t just about hanging pictures; it’s about creating a space you love and feel safe in.

Join the DIY Community

Your home is a canvas for creativity. Engage with fellow DIY enthusiasts and share your successes—and failures. Have a project idea or anchor story? Head to local forums or social media and connect with other Southeast Michigan homeowners. Good luck, and remember to have fun as you improve your home!

Home

Write A Comment

*
*
Related Posts All Posts
06.01.2025

Harvesting Rhubarb Safely: A Guide for Southeast Michigan Homeowners

Update Why Harvesting Rhubarb the Right Way Matters Rhubarb isn’t just any vegetable; it’s a reliable staple in your garden, rewarding you with sweet and tart flavors for years to come. Understanding the right harvesting techniques is critical, especially for homeowners in Southeast Michigan where seasonal growing conditions can vary. By following expert guidance, you ensure your rhubarb remains healthy and productive, contributing deliciously to your kitchen creations. A Peek into the Life Cycle of Rhubarb When first planting rhubarb, resist the urge to harvest in its initial years. Gardening expert Laura Irish-Hanson from the University of Minnesota Extension emphasizes that it’s best to wait until the third year for a full harvest. This allows the plant to strengthen its crown and establish a robust foundation for future production. Starting off on the right foot nurtures the long-term vitality of your plants, which is crucial for any DIY vegetable garden enthusiast aiming for sustainability. Harvesting Techniques: Do's and Don'ts To properly harvest rhubarb, skip the pruners and knives—trust your hands instead. Grip the petiole at its base and twist gently. This technique ensures minimal damage to the plant and helps prevent diseases. Once you’ve harvested the stalk, promptly cut off the toxic leaf to keep pets and family safe. Remember to harvest moderately; taking no more than half of the plant encourages healthy regrowth. The Risks of Improper Harvesting Many novice gardeners overlook the timing and method of harvesting, which can severely affect the plant’s health. Harvesting too early or taking too much can stress the rhubarb, leading to poor yields in subsequent years. Moreover, keep in mind the toxicity of rhubarb leaves—education is your best protection! For the bustling homeowners in Southeast Michigan, this knowledge enhances not only your gardening practices but also keeps your family safe. Making the Most of Your Rhubarb Once you've mastered harvesting techniques, consider how you can incorporate rhubarb into your meals. Its unique tart flavor is perfect for jams, desserts, or as a complementary side dish. Not only does rhubarb beautify your garden, but it enriches meal times with its versatile culinary applications. Final Thoughts: Seasoned Care for Your Rhubarb For success in your home garden, staying informed and educated is key. By adhering to these government-backed and expert insights, your rhubarb will not only flourish but will bring layers of flavor to your dishes for years to come. So roll up your sleeves, homeowners of Southeast Michigan, and embrace the rewarding experience of planting and harvesting rhubarb! Ready to improve your home's outdoor experience? Embrace the joys of gardening and let your kitchen be the canvas for your creativity!

05.31.2025

Can Costco Laundry Detergent Effectively Clean Your Vinyl Siding?

Update Is Costco Laundry Detergent Safe for Vinyl Siding? Homeowners in Southeast Michigan are always on the lookout for effective cleaning solutions, and one question that arises is whether Costco’s Kirkland laundry detergent can serve a dual purpose beyond washing clothes. Many swear by its cleaning power, but does it really have what it takes to clear away the grime from vinyl siding? Understanding the Ingredients First off, let’s take a look at what’s really in Kirkland laundry detergent. According to materials safety data, this heavy-duty detergent is free from phosphates. This is a big plus for the environment, as it won’t harm your surrounding vegetation or affect the local water systems. It mainly contains salts, alcohols, and fatty acids — surfactants that help lift dirt and grime from surfaces. The unscented option, in particular, is a good choice for cleaning siding, as scented varieties tend to have additional chemicals that might not be ideal for outdoor use. Why Use Laundry Detergent on Siding? The answer is yes — you can clean your vinyl siding with Costco laundry detergent. Cleaning expert Derek Christian states, "Laundry detergent has been used for decades to clean heavily soiled places, including siding." This is especially true for those stubborn stains caused by dirt and mildew, which can accumulate on vinyl siding over time. When to Use Caution However, not everything about using laundry detergent for siding is straightforward. While it’s effective at removing basic stains, it lacks the organic-killing ingredients necessary to deal with black mold or green algae. For these issues, homeowners may need to consider stronger cleaning agents, such as bleach or hydrogen peroxide, to ensure the organic materials are eradicated. Remember, mixing these additives carefully with your detergent can enhance cleaning effectiveness while keeping your home’s exterior safe. The Risks of Improper Use Another important consideration is the potential for leaving behind residue. As Scott Schrader points out, if not rinsed thoroughly, detergent can lead to discoloration or even damage your siding over time. To avoid this, ensure that you dilute the detergent properly and thoroughly rinse your siding after cleaning. Failure to do so might result in a sticky residue that attracts more dirt later on. Your Next Steps For homeowners ready to tackle the cleaning task, start by preparing a solution using Kirkland laundry detergent diluted with water. Regularly maintaining your vinyl siding keeps your home looking its best and helps preserve its integrity. While DIY cleaning can save you money, don't hesitate to hire a professional if you're dealing with extensive stains or concerns about safety. As you embark on your home improvement journey, remember that the tools and techniques you choose can make all the difference in achieving optimal results. Don’t hesitate to ask for advice or research further to find the best practices for siding maintenance.

05.30.2025

Affordable Luxurious Home Decor Ideas That Look Expensive

Update Transform Your Home on a Budget: Affordable Luxurious Upgrades Every homeowner in Southeast Michigan dreams of making their space feel warm, inviting, and a touch luxurious, but doing so on a budget can be tricky. Fortunately, there are numerous ways to achieve that high-end look without hefty expenses. With a bit of creativity, some strategic planning, and an eye for detail, you can turn your home into a charming sanctuary that looks expensive and tasteful. Highlight Architectural Features One of the key strategies in enhancing your home’s aesthetics is to focus on its existing architectural features. If your space includes elements like hardwood floors, crown molding, or built-in shelves, emphasize these details. Keeping these areas clean and uncluttered can create a striking focal point in any room. For instance, if you have a stunning fireplace, don’t let it compete with bold artwork or decorative accessories. Instead, let it shine as the room's centerpiece. Embrace Minimalism for a Luxurious Look Another avenue to explore is minimalism—a design approach that encourages simplicity yet holds great elegance. Reducing the number of decorative items you incorporate allows each piece to stand out and maintain a sense of sophistication. By organizing your items into neat piles or using stylish storage solutions, you can keep spaces clutter-free. Studies suggest that cleaner environments not only look better but feel better too. The Impact of Paint: A Budget-Friendly Makeover When it comes to transformation, paint stands out as an incredibly cost-effective solution. “Paint is extremely inexpensive and makes a big difference,” says interior designer Keysha Jillian from K. Jillian Designs. Whether a soft neutral or a bold deep hue, the right color can entirely change the dynamics of a room. Classic choices like beige and gray are timeless and versatile, while deeper colors like navy add a touch of sophistication when paired with metallic accents. Choosing the Right Palettes Curating a color palette that complements each room is essential. Interior designer Douglas Graneto emphasizes the power of deep hues combined with shiny finishes to create a glamorous energy. However, be cautious about overemphasis on color. Sprinkle in one or two accent shades to add personality without overwhelming the space. “Too many bold colors might lean towards shabby chic rather than luxe,” cautions Drew Henry, founder of Design Dudes. DIY Decor that Adds Class If you're feeling crafty, consider creating your own home decor pieces. DIY projects not only add a personal touch to your home but can also save money. Consider making custom artwork or simple furniture enhancements that align with the overall theme and color of your home. Websites and local workshops often have excellent resources for beginner projects, making it an exciting endeavor. Call to Action: Elevate Your Home Today! Why wait to make your home an epitome of style and comfort? Incorporating these cheap decorating ideas and focusing on the existing beauty of your home can lead to a transformation that feels both expensive and beautiful. So, gather your supplies, set aside some time, and start elevating your living space with a touch of DIY magic!

Add Row
Add Element
cropper
update

Southeast Michigan

Home and Yard

cropper
update

Covering everything from local real estate updates and home improvement advice to seasonal lawn care tips and regional events, our site keeps you informed and inspired.

  • Facebook Home and Yard Page
    update
  • update
  • update
  • update
  • update
  • update
  • update
Add Element

COMPANY

  • Privacy Policy
  • Terms of Use
  • Advertise
  • Contact Us
  • Menu 5
  • Menu 6
Add Element

(269) 359-3322

AVAILABLE FROM 8AM - 5PM

Portage, Michigan

Add Element

ABOUT US

Southeast Michigan Home and Yard is a produced by Ingenuic Media Group. 


Ingenuic Media Group promotes local businesses through media promotion and digital marketing.

Add Element

© 2025 CompanyName All Rights Reserved. Address . Contact Us . Terms of Service . Privacy Policy

Terms of Service

Privacy Policy

Core Modal Title

Sorry, no results found

You Might Find These Articles Interesting

T
Please Check Your Email
We Will Be Following Up Shortly
*
*
*