Add Row
Add Element
Southeast Michigan Home and Yard Logo
update
update
Add Element
  • Home
  • Categories
    • Home
    • Yard
    • Technology
    • News
    • Food
    • Events
    • Featured

Southeast Michigan

HOME AND YARD

  • Facebook Home and Yard Page
    update
  • update
  • update
  • update
  • update
  • update
  • update
May 26.2025
3 Minutes Read

Savor the Flavor: Enjoy Delicious Slow Cooker French Dip Sandwiches

Slow Cooker French Dip Sandwich dipped in au jus.

How to Create the Perfect Slow Cooker French Dip Sandwich

If you’re looking for a meal that brings the family together, a Slow Cooker French Dip Sandwich is a delicious choice. This hearty dish does more than just fill your belly; it ignites memories of cozy gatherings and hearty conversations around the dinner table. With a flavorful broth-soaked beef filling and crusty rolls, every bite is a taste of love.

Ingredients to Elevate Your French Dip

A classic French dip sandwich features simple yet satisfying ingredients. Starting with a quality chuck roast is key. When cooked low and slow, it becomes tender and full of flavor. Don’t skimp on a good baguette-style roll; it’ll absorb the rich au jus while holding up to the savory, juicy beef.

Many recipes suggest omitting cheese, allowing the robust flavors of the beef to shine. However, if you're feeling indulgent, try adding provolone or mozzarella for an extra layer of deliciousness.

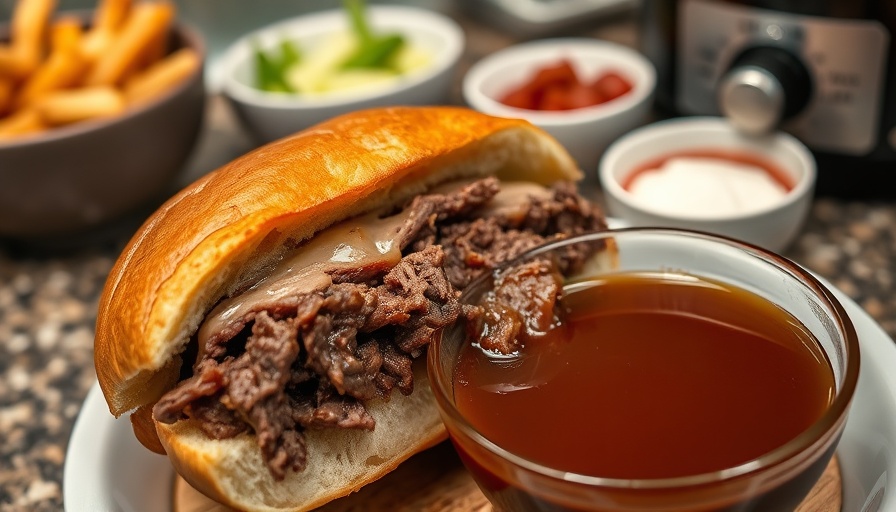
Making Your Own Au Jus: A Flavorful Dip

The au jus sauce is where a lot of the sandwich magic happens. This is not just any broth; it’s the liquid from cooking the beef alongside onions and seasoning. By adding a little cornstarch, you can create a slightly thicker sauce that clings to your beef without becoming gravy. This extra step enhances the flavor and texture of your dipping sauce.

A Slow-Cooked Meal for Busy Families

Imagine coming home after a long day to the comforting scent of a home-cooked meal. The magic of slow cooking not only makes preparing dinner easy but can also provide leftovers for days—perfect for busy families wanting to eat well without breaking the bank. This recipe fits seamlessly into a chaotic week, allowing you to focus on what matters most.

Why Slow Cooking? The Benefits of This Cooking Method

Slow cooking is a technique steeped in tradition. By gently cooking meats for hours, you not only enhance flavors but also save money. Chuck roast is often more budget-friendly than other cuts, making this recipe perfect for eating on a dime. Plus, the leftovers can be transformed into amazing meals, saving both time and effort in future meal prep.

Tips for Perfecting Your French Dip Sandwich

  • Don’t Rush the Cooking: Allow the roast to cook fully to achieve the softness that defines a delightful French dip.
  • Rest the Meat: Letting the beef rest before slicing or shredding ensures that it retains moisture, elevating the sandwich to a whole new level.
  • Side Dishes Matter: Pair your French dip with a refreshing coleslaw or crispy oven fries for a complete meal that everyone will love.

Cooking as a Family Affair

Food is more than nourishment; it’s an experience. Involving the family in meal preparation turns cooking into a bonding moment. Whether you’re chopping vegetables or setting the table, these tasks encourage teamwork and create lasting memories. Sharing stories over a pot of slow-cooked beef can enrich the dinner experience and promote a sense of togetherness.

Conclusion: A Dish to Bring Families Together

Next time you’re looking for a meal that brings warmth and comfort into your home, consider the Slow Cooker French Dip Sandwich. It’s easy to make, budget-friendly, and packs a punch of flavors that everyone can enjoy. Cooking at home not only saves money but fills your heart with the joy of creating, sharing, and enjoying meals together. Try it out tonight and create your own delicious family memories!

If this recipe inspires you, don’t hesitate to share your own family cooking experiences in the comments below or explore more delightful home cooking recipes on our blog!

Food

Write A Comment

*
*
Related Posts All Posts
08.19.2025

Uncover the Best Chocolate Zucchini Bread Recipe for Home Cooks!

Update The Secret to Perfectly Moist Chocolate Zucchini Bread Are you ready to dive into a surprisingly delightful dish that blends the rich goodness of chocolate with the wholesome nutrition of zucchini? Let’s talk about Chocolate Zucchini Bread. This recipe is a favorite, especially when you want something sweet yet secretly healthy. It’s not just about indulging your sweet tooth; it’s an easy way to incorporate more veggies into your diet—and you won’t even notice it! Why Chocolate and Zucchini Work Together Zucchini is a superhero in baking! When blended with chocolate, it offers moisture without overpowering the flavor. The key is to use the right kind of zucchini. For your chocolate zucchini bread, small to medium zucchinis will do just fine—there's no need to peel them! Make sure to squeeze a little moisture out if you're using garden-fresh zucchini since they can be water-heavy. Easy Ingredients for a Delightful Bake This recipe emphasizes pantry staples that you likely already have on hand. The beauty of chocolate zucchini bread lies in its simplicity: Cocoa powder and mini chocolate chips give it that sweet, rich flavor. Room temperature eggs whip up better, creating a light, airy loaf. If you don't have applesauce on hand, substitutions like mashed banana or pumpkin puree will work wonders. These slight tweaks not only keep the bread moist but also introduce new flavors that keep your taste buds dancing! A Few Essential Tips for Success Baking doesn’t have to be intimidating, and with the right tips, you’ll be a pro in no time: Grate Smart: Use a box grater for quick zucchini shredding. Prep Your Pans: Line loaf pans with parchment paper for hassle-free removal and clean-up. Be Patient: Oven temperatures vary, so start checking your bread 10 minutes before the timer goes off. These steps will set you up for success and get that perfect loaf every time! Fun Variations to Try! Feeling adventurous? Here are some exciting twists to jazz up your chocolate zucchini bread: Add chopped nuts like walnuts or pecans for an extra crunch. For a tropical touch, mix in shredded coconut. Try using white chocolate or peanut butter chips for a fun flavor kick! Don’t hesitate to experiment; cooking should feel free and personal, just like the meals you share with loved ones! The Best Ways to Store Your Delicious Creation After all that hard work, you want to savor every bite! Store your chocolate zucchini bread in a zippered bag at room temperature for about four days. If it lasts that long, you can even refrigerate it for up to a week. Feeling generous? You can freeze slices wrapped in plastic wrap for up to two months. This makes for an awesome keto meal prep option for busy nights! Embrace the Joy of Cooking Creating a loaf of chocolate zucchini bread isn’t just about the end result; it’s about the journey. Gathering the ingredients, mixing, and waiting for that delicious aroma to fill your kitchen can be incredibly rewarding. As you savor that first slice, remember that it’s more than just a treat—it’s a reflection of love and care that goes into every homemade dish. Ready to Bake? If you’ve enjoyed reading about how to make chocolate zucchini bread with me, I invite you to try your hand at it. Whether you’re looking to impress guests or simply treat yourself, this recipe is the perfect blend of ease and delight. So gather your ingredients, roll up your sleeves, and let’s bake! And if you love what you create, make sure to share it with friends and family. Happy baking!

08.18.2025

Discover the Crispy Tater Caesar Salad: A Fun, Hearty Twist You’ll Love!

Update Introducing the Crispy Tater Caesar Salad: A Hearty Twist on a Classic! If you've ever wondered how to elevate a classic dish like Caesar salad, let me introduce you to the Crispy Tater Caesar Salad. This innovative take combines the crunchy satisfaction of tater tots with fresh greens, blackened chicken, and crispy bacon, all tossed in a creamy Caesar dressing. Perfect for a hearty lunch or light dinner, this salad promises to tantalize your taste buds and bring excitement to your table. What Makes Tater Caesar Salad So Special? At the heart of this dish is the unique use of smashed tater tots instead of traditional croutons. Why tater tots, you may ask? They not only add a surprising crunch but also bring in a cheesy, savory flavor that complements the freshness of the romaine lettuce beautifully. Plus, they make for a fun cooking experience! The crispy, cheesy texture of the tater tots provides a delightful contrast against the tangy dressing and tender chicken, making each bite a satisfying explosion of flavors. For those who love a good twist on tradition, this salad is a must-try! Ingredient Insights: Maximize Flavor on a Budget One of the best aspects of the Crispy Tater Caesar Salad is its adaptability. Here are some tips on how to get the most out of your ingredients without breaking the bank: Tater Tots: Whether you buy them frozen or make them from scratch, they are a budget-friendly ingredient that can be stored for later use. Consider using sweet potato tater tots for a healthier option! Chicken: Opt for rotisserie chicken or leftovers for a speedy meal prep. Fresh or frozen cutlets work great, too! Bacon: Instead of pre-packaged bacon bits, you can easily cook your own bacon to add a rich flavor and crispy texture. Diced ham or even turkey bacon could serve as alternatives. Dressing: Either make your Caesar dressing at home or use a store-bought one for quick assembly. A homemade dressing can enhance the salad's freshness and flavor profile. Not Just Another Salad: The Emotional Connection to Food Why is this dish so appealing? Beyond the flavors and textures, food often serves as a vessel for cherished memories and warmth. Growing up, many of us had family gatherings centered around meals that sparked joy and connection. This salad not only nourishes but can also evoke fond memories when shared with loved ones. It’s a dish that invites conversation around the table, allowing families to create their own memories while savoring delicious flavors together. Serving Ideas: Make It Your Own The beauty of the Crispy Tater Caesar Salad lies in its versatility. Feel free to modify the ingredients based on your preferences. For a bit of spice, add diced jalapeños or pickled peppers. If you want an extra crunch, shredded carrots or broccoli can also be incorporated. You can even play with seasonings to enhance the flavor further. Keep it simple, or get creative—either way, you can’t go wrong! Food Trends: Why This Dish Is Going Viral Recently, fusion dishes like the Tater Caesar Salad have gained popularity on social media platforms, particularly for their bold flavors and creative presentations. These viral food trends not only inspire home cooks but also bring joy to those who enjoy experimenting in the kitchen. The combination of comfort food with a healthy twist continues to strike a chord with many, making it an ideal choice for those looking to try something new yet comforting. Quick Steps to Make Your Crispy Tater Caesar Salad Ready to dive in? Here’s a simplified version of how to throw together this fun salad: Bake: Start by baking your tater tots until golden and crispy, then smash them slightly before combining with your chicken. Mix: In a large bowl, combine the Caesar dressing with your choice of cheese, bacon bits, and veggies. Combine: Gently fold in the crispy tater tots and romaine lettuce. Garnish: Finish with a sprinkle of parmesan cheese and cracked black pepper for that added touch! Storing and Refreshing Your Salad Have leftovers? Simply store your salad in an airtight container for up to three days. To refresh, just add some fresh romaine and a splash of dressing if it seems to have dried out. This means you can enjoy your delicious creation without waste! As we all dive into our busy lives, let’s not forget about the connections food can foster and the joy of cooking. The Crispy Tater Caesar Salad not only brings a fun twist to your plate but can also create moments of togetherness and love. Happy cooking! Are you ready to bring this new salad trend into your kitchen? Give it a try and connect with your loved ones over a heartwarming meal that’s both fun and nutritious!

08.17.2025

Master the Art of Homemade Enchilada Sauce for Flavorful Meals

Update Crafting the Perfect Enchilada Sauce: A Delicious Adventure If you’ve ever fallen in love with Tex-Mex flavors, you owe it to yourself to master a homemade enchilada sauce. Not only is it rich, smoky, and ready in just 20 minutes, but it also adds layers of savory flavor to your dishes. Once you try making it yourself, there’s no going back to the canned versions! Unpacking the Flavor Profile: What Makes This Sauce Stand Out? This enchilada sauce is a delightful blend of chili powder, garlic, cumin, and oregano. Mixed with tomato sauce and broth, the result is a savory, spicy, and earthy beauty that will elevate your meals. The unique combination of these spices means you can adjust the flavor to be just how you love it. Using Fresh Ingredients: Why They Matter When making your sauce, the foundation is simple pantry staples. You’ll want plain tomato sauce instead of paste or puree for that authentic texture. The versatility of broth is also striking—whether you have chicken, beef, or vegetable broth on hand, it’ll work like a charm! This flexibility means you can whip it up anytime without unnecessary trips to the grocery store. Customization is Key: How to Spice It Up or Down This recipe is a joy because it accommodates personal taste! Love heat? Throw in more chili powder, a pinch of cayenne, or some diced jalapeños. Prefer something milder? A splash of milk or sour cream will add creaminess while toning down the spices. Experimenting with this sauce will allow you to find your signature flavor. Versatile Uses: More Than Just Enchiladas Let’s talk practical—a homemade enchilada sauce isn’t just for enchiladas. Drizzle it over chorizo tacos, mix it in with chili cheese fries, or pour it on a baked potato heaped with cheese and sour cream. The options are endless, making it a remarkably efficient addition to your meal prep. Storage Savvy: Keeping Your Sauce Fresh One of the best parts about making your own enchilada sauce is knowing exactly what goes into it, plus its shelf life! Keep your leftovers in a mason jar in the fridge for up to 4 days, or feel free to freeze it. Use a zippered bag, remember to squeeze out the air, and you’ll have this flavorful sauce ready at your fingertips for up to four months! How to Make Enchilada Sauce: A Step-by-Step Guide 1. **Prepare a Roux**: Start by making a roux—a mixture of flour and oil in a pan. This thickens your sauce and adds depth. 2. **Whisk in Flavor**: Stir in your seasonings and combine well with the roux before adding tomato sauce and broth. Gradually add these ingredients to keep everything smooth. 3. **Simmer and Season**: Let it bubble before reducing the heat to a simmer for a few minutes. Finish by adjusting the salt and pepper according to your taste. Bringing it All Together: The Emotional Connection to Our Food Cooking enchilada sauce isn’t just about the ingredients or techniques; it’s about sharing moments of joy, love, and togetherness. Many of us have fond memories involving family meals—what better way to honor that tradition than by creating a dish from scratch? Food has the incredible power to connect us, and this sauce is a fantastic way to start your culinary journey. Remember, the goal is to create meals with intention, easy on the wallet, and packed with love. Share this delicious enchilada sauce with your family and friends, and invite them into your kitchen. Happy cooking!

Terms of Service

Privacy Policy

Core Modal Title

Sorry, no results found

You Might Find These Articles Interesting

T
Please Check Your Email
We Will Be Following Up Shortly
*
*
*