Add Row
Add Element
Southeast Michigan Home and Yard Logo
update
update
Add Element
  • Home
  • Categories
    • Home
    • Yard
    • Technology
    • News
    • Food
    • Events
    • Featured

Southeast Michigan

HOME AND YARD

  • Facebook Home and Yard Page
    update
  • update
  • update
  • update
  • update
  • update
  • update
June 12.2025
3 Minutes Read

Understanding the Importance of Checking Your Mirrors Even with a Backup Camera

Backup camera safety display on snowy driveway.

Why Backup Cameras Are Essential, but Mirrors Still Matter

As much as we rely on technology these days, the basics of driving safety remain unchanged. Backup cameras are fantastic tools that enhance our awareness of surroundings, especially low blind spots that traditional mirrors miss. They make manoeuvering in tight parking spots a breeze and have significantly reduced low-speed collisions. However, even with these advancements in vehicle safety, there’s a crucial point that every driver should remember: always check your mirrors, even with a backup camera.

The Limitations of Backup Cameras

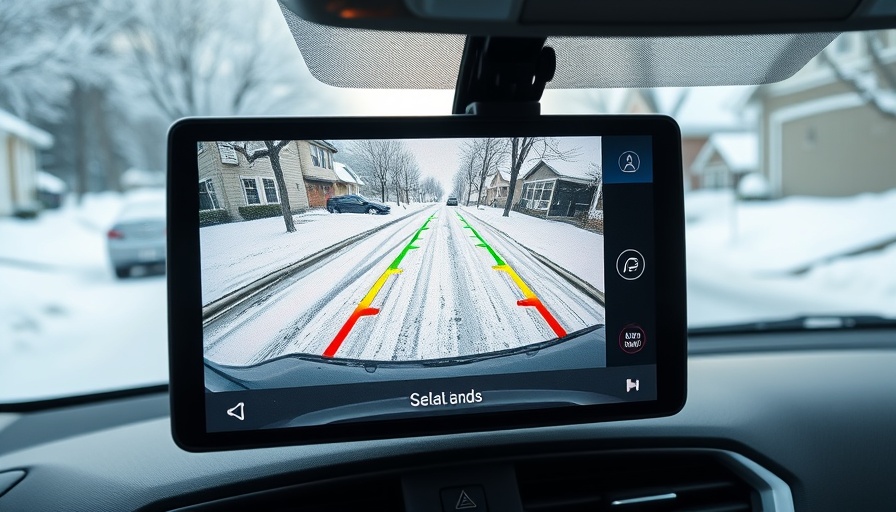
Backup cameras, or rearview cameras, provide drivers with a live feed of what’s behind their vehicles. But, as much as they improve visibility, they should not be the only source of information drivers rely on. According to certified instructor Steven Norman, they do improve safety but come with their own limitations. “Backup cameras don’t show everything, especially objects low to the ground or just outside their frame,” he explains. For example, small pets or children playing behind your car might not be seen until it’s too late.

Why Mirroring Matters in Your Driving Routine

Incorporating mirror checks into your driving routine does more than comply with safe driving practices; it offers a broader view of traffic and surroundings. Erika Tortorici from Optimum Insurance Solutions emphasizes that “both backup cameras and rearview mirrors serve important safety purposes and should not be relied on in isolation.” Mirrors not only help perceive traffic but also offer insights into the driving patterns of vehicles around you, an area where cameras can fall short.

Understanding When to Use Each Feature

So when should you utilize your backup camera versus your mirrors? Always use both. Use your mirrors for a comprehensive view of all surrounding traffic and to gauge the position of other vehicles. As you approach a parking space or driveway, switch to your backup camera to spot any low obstacles. This combination helps in taking a comprehensive approach towards driving safety.

Stats on Backup Camera Effectiveness

Research indicates that the introduction of backup cameras has cut rear-related accidents significantly. It gives clarity when backing up, especially for larger vehicles like SUVs and trucks. However, it’s essential to complement this feature to fully reap the benefits. Research shows that visually checking mirrors just before moving can increase awareness and decrease accident likelihood.

Actionable Tips for Safer Driving

Here are some practical steps you can take to incorporate both tools into your driving:

  • Before getting into the vehicle, check all mirrors: Adjust for optimal visibility.
  • Combine checks: Always look in your mirrors before engaging reverse and utilizing the backup camera.
  • Practice in a safe environment: Use an empty parking lot to get comfortable switching between mirror checks and backup camera views.

Final Thoughts

In conclusion, while backup cameras are a valuable addition to modern vehicles, they do not replace the inherent value of mirror checks. It’s crucial for all drivers, especially homeowners navigating driveway spaces, to incorporate both for a safer driving experience. Embrace these technologies, but remember: common sense, and traditional skills, still hold great importance on the road.

...For more exciting DIY tips and home improvement advice that is both fun and practical, stay tuned! Knowledge is power when it comes to creating safe and enjoyable home environments.

Home

Write A Comment

*
*
Related Posts All Posts
10.20.2025

Maximize Comfort: The Best Sectionals for Small Spaces in Michigan

Update Discovering the Perfect Sectional for Your Small Space Finding the right couch for a small living area can feel daunting, especially if you love the idea of a sectional sofa but worry about space constraints. Fortunately, today's market offers compact sectionals that blend comfort, style, and functionality seamlessly. Our extensive testing reveals that you don't have to sacrifice quality or aesthetics even in cozy setups. Why Choosing a Suitable Sectional Matters A well-selected sectional is more than just a place to sit—it's the heart of your living space. It shapes how you interact with loved ones, maximizing comfort without overcrowding your area. Especially for homeowners in Southeast Michigan, where homes often feature snug living rooms, a cleverly designed sectional can enhance flow and usability. Key Findings from Our Expert Testing Over the course of a year, we evaluated multiple models, considering comfort, durability, and versatility. The Lovesac Sactional shines as the top choice, standing out for its modular assembly and machine-washable covers. This sectional allows for endless configurations, catering to changing needs—from a cozy evening reading nook to accommodating visitors on a sleepover. The Wade Logan Barrientez Upholstered Sleeper Sofa and the Medley Dekayess Bumper Sectional also captured our attention with their space-saving designs and style. Each tested piece featured thoughtful construction tailored for smaller spaces, ensuring you can invest in a piece that lasts. Comparative Insights: Sectionals vs. Couches While traditional sofas remain popular, sectionals can provide extra seating options, often allowing for a more intimate layout. A well-thought-out sectional, such as the Sabai Design The Elevate Sectional, can double as a lounge area and a guest bed without requiring significant floor space. This flexibility is beneficial for those reaching out to creativity with room design. Popular Trends in Sectionals for Small Spaces Among the trends escalating in popularity, multifunctionality reigns supreme. Many brands are realizing the demand for versatile furniture that accommodates various uses, such as sleeper options seamlessly woven into their designs. Homeowners can enjoy crisp designs with hidden benefits—perfect for impromptu gatherings. Cost Considerations: Investing Wisely Investing in a quality sectional does mean initial costs can be higher than traditional couches, notably with the Lovesac, where customizable configurations may require a significant upfront investment. However, over time, this has the potential for great returns, functioning beautifully in your home for years to come. Final Thoughts on Sectionals for Small Spaces A quality sectional can transform your living space and enhance your everyday living experience. While it may feel overwhelming to choose the right style and configuration, staying informed empowers you to make the best decision for your home. So, are you ready to refresh your living space? Consider these options for small sectionals that enhance your home while maximizing comfort.

10.19.2025

Brighten Your Home This Holiday with the DIY Pool Noodle Hack

Update Transform Your Home for the Holidays with This Creative Pool Noodle Hack As the holiday season approaches, homeowners in Southeast Michigan are looking for fresh and engaging ways to enhance their home décor without causing damage or breaking the bank. The latest trend, fueled by TikTok creativity, introduces a surprisingly simple solution: pool noodles. Not just for summer splashes, these flexible foam tubes can turn your fireplace mantle into a festive masterpiece with minimal effort and impact. A Simple Yet Effective Fireplace Decoration The genius behind the pool noodle fireplace decoration hack comes from TikTok user @craftybudgetqueen. This DIY project requires just a few supplies, most notably, a pool noodle. Start by carefully cutting the noodle open and fitting it snugly over the edge of your mantle. The next step is equally simple: make vertical cuts along the length of the noodle, creating slots into which decorative pieces will fit without damage to the mantel itself. This is a crucial step that not only allows for creativity but also preserves your home’s finish. Layering for a Stunning Effect Once the noodle is secured, it becomes a base for your decorations. Insert long-stemmed flutes filled with water and topped with tea lights for the soft glow that evokes holiday cheer. For color, attach faux evergreen garlands along the noodle's length, tucking in vibrant poinsettias and holly berries to complete the look. This layered effect not only hides the noodle but transforms it into a decorative element that captures the spirit of the season. Alternative Uses and Other Crafty Ideas If you’re not keen on using tea lights, consider alternatives like pre-lit garlands or colorful beads for a safer, flame-free decoration. Pool noodles can also be repurposed for centerpieces or outdoor decorations. As noted in Apartment Therapy's exploration of DIY decorations, these versatile foams can adapt to various holiday themes such as Halloween or birthdays, showcasing their year-round usability. The Benefits of DIY Holiday Crafts Engaging in DIY projects not only saves money but fosters creativity and can be a fun family activity. By utilizing inexpensive materials such as pool noodles, you can craft unique decorations that stand out and are unforgettable. Furthermore, as Alyssa Longobucco from Apartment Therapy highlights, the act of creating something with your hands can bring a sense of joy and accomplishment, enhancing the overall festive experience. Why Choose DIY Over Store-Bought? Many homeowners in Southeast Michigan are discovering the myriad benefits of creating their own holiday decorations. With DIY projects, you can customize your décor to fit your home's unique style and preferences, allowing for personalization that store-bought items may lack. In addition, DIY projects like the pool noodle hack promote sustainability by utilizing materials that might otherwise go to waste. In conclusion, whether you're looking to refresh your home décor or want to get in the holiday spirit, this pool noodle hack for holiday decorating is a fantastic way to guarantee that your décor is stunning, festive, and most importantly, damage-free. Gather your supplies, get crafty, and enjoy a holiday season filled with creativity and cheer! For more holiday decorating inspiration and tips, visit local craft stores or browse online for further ideas. Your creative home project is just a pool noodle away!

10.18.2025

Build Your Own Entryway Hall Tree: Tips for DIY Success

Update Transform Your Entryway: Build Your Own Hall Tree Many homeowners overlook the entryway as an essential part of their home. But your entryway deserves just as much attention as any other part of your living space. Why not create a stunning and functional entryway by building your own hall tree? This piece not only offers practical storage but also elevates the overall aesthetic of your home. In this guide, we’ll walk you through the process of crafting a beautiful DIY hall tree that caters to your specific needs, helping you save money while showcasing your handiwork. What is a Hall Tree and Why You Should Consider Building One A hall tree is more than just an element of furniture—it's a practical solution for keeping your entryway organized. Combining a coat rack with a comfortable seat and storage options, a hall tree helps you maintain order in one of the busiest parts of your home. When you create a DIY version, you gain the flexibility to design it to fit your space perfectly, just the way you want. Gather Your Tools and Materials Before diving into assembly, gathering all necessary tools and materials is crucial for a smooth project. You might want to include: ¾-inch plywood sheets Solid wood for trim and hooks Wood glue and screws Drill, miter saw, and sandpaper With these essentials on hand, you’re ready to get started! Step-by-Step Overview of Building Your Hall Tree Here is a simplified list of steps to guide your construction journey: Preparation: Cut your plywood to specified dimensions. It's like a puzzle where each piece fits perfectly! Assemble the Bench: Create the base with a 16-inch high bench for seating. Use pre-primed boards for a tidy finish. Construct the Back Panel: Securely attach it to the bench. This will provide stability and support for hanging items. Install Hooks: Place coat hooks strategically along the top to make hanging jackets a breeze. Finishing Touches: Sand and apply a stain or paint that complements your home’s decor. Throughout each phase, taking time to measure and ensure proper alignment will make a significant difference in the final look of your hall tree. Custom Features to Consider Your hall tree can be as unique as you are! Consider adding features such as: Shoe cubbies to keep mud and dirt at bay A place for backpacks or sports gear, ideal for families A weatherproof finish, especially suitable for regions with fluctuating weather This level of personalization means your hall tree is not just furniture; it’s an integral part of your family’s daily routines. Maintenance: Keeping Your Hall Tree in Top Shape Once you have your hall tree crafted and in use, it's essential to maintain its functionality. Regularly check hardware like hooks to ensure they remain secure. Cleaning the surface with a gentle polish will help keep the wood looking its best. Investing time in maintenance is key to ensuring your DIY hall tree continues to serve your family well for years to come. Why DIY is Right for You Building your hall tree resembles creating a family photo album; it encapsulates personal history and reflects unique experiences. It’s not just about saving money, but also about acquiring skills and the pride of craftsmanship. As you unleash your creativity and turn ideas into reality, remember that even if the project seems daunting, you can always consult a professional for advice or assistance. So, if you’re ready to elevate your home’s entryway while honing your DIY skills, grab your tools and let’s get building!

Terms of Service

Privacy Policy

Core Modal Title

Sorry, no results found

You Might Find These Articles Interesting

T
Please Check Your Email
We Will Be Following Up Shortly
*
*
*